Enabling students to book lectures
1. General enabling of students
First, it will be necessary to activate the general enabling of students to be able to independently schedule their own purchased lessons by navigating to Configuration → Settings and opening the "Student and Tutor Related Settings" section.
From the section "Planning and purchasing on your own" place the checkmark "Allow users to plan their own individual lessons" and choose one of the following options:
- Booked lessons must be confirmed by the secretary or lecturer: by choosing this option, following the scheduling of the lesson by the student, secretary or lecturer will have to confirm or reject the request through their account
- Booked lessons must be confirmed by the secretary's office.: by choosing this option, following the scheduling of the lesson by the student, the secretary will have to confirm or reject the request through their account
- Booked lessons are automatically confirmed: By choosing this option, lessons scheduled by students will be understood to be confirmed immediately
Below, via the blue bar below, dragging the blue circles forward or backward will indicate the general times for students to book classes.

In addition, in case one of the first two options was chosen for the confirmation of the lesson booked by the user, through the field below the blue bar it will be possible to indicate the number of hours before the start of the lesson by which the lesson must be accepted.
In case of no confirmation within the stipulated time, the class will be cancelled.
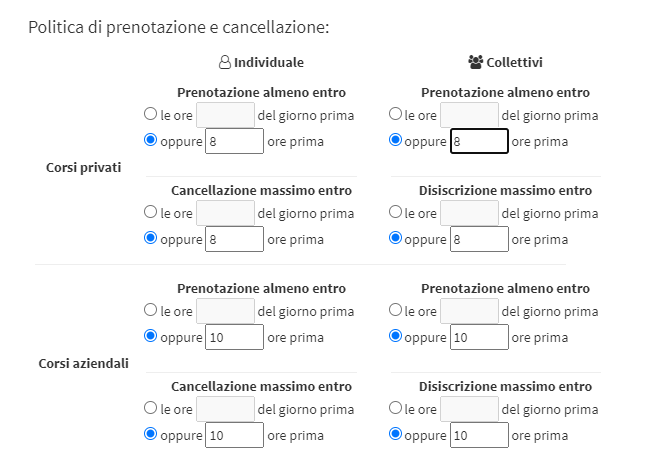
Through the section below called "Reservation and cancellation policy", it will be possible, optionally, to indicate the timeframe within which, with respect to the time of the lesson to be booked/reserved, users can book a new lesson or cancel a booked one.

Reservation/cancellation policies may be differentiated for group courses (i.e., enrollment of individual students via group carnet to classes of already scheduled group courses. Read here for more information ) or individual courses, and private courses or corporate courses.
For each type of course also it will be possible to indicate:
- The hours of the day before by which to book/cancel the class (e.g., by 5 p.m. the day before)
- The number of hours before the actual start of the lesson you intend to book (e.g., 8 hours from the time of booking to the start time of the booked lesson)
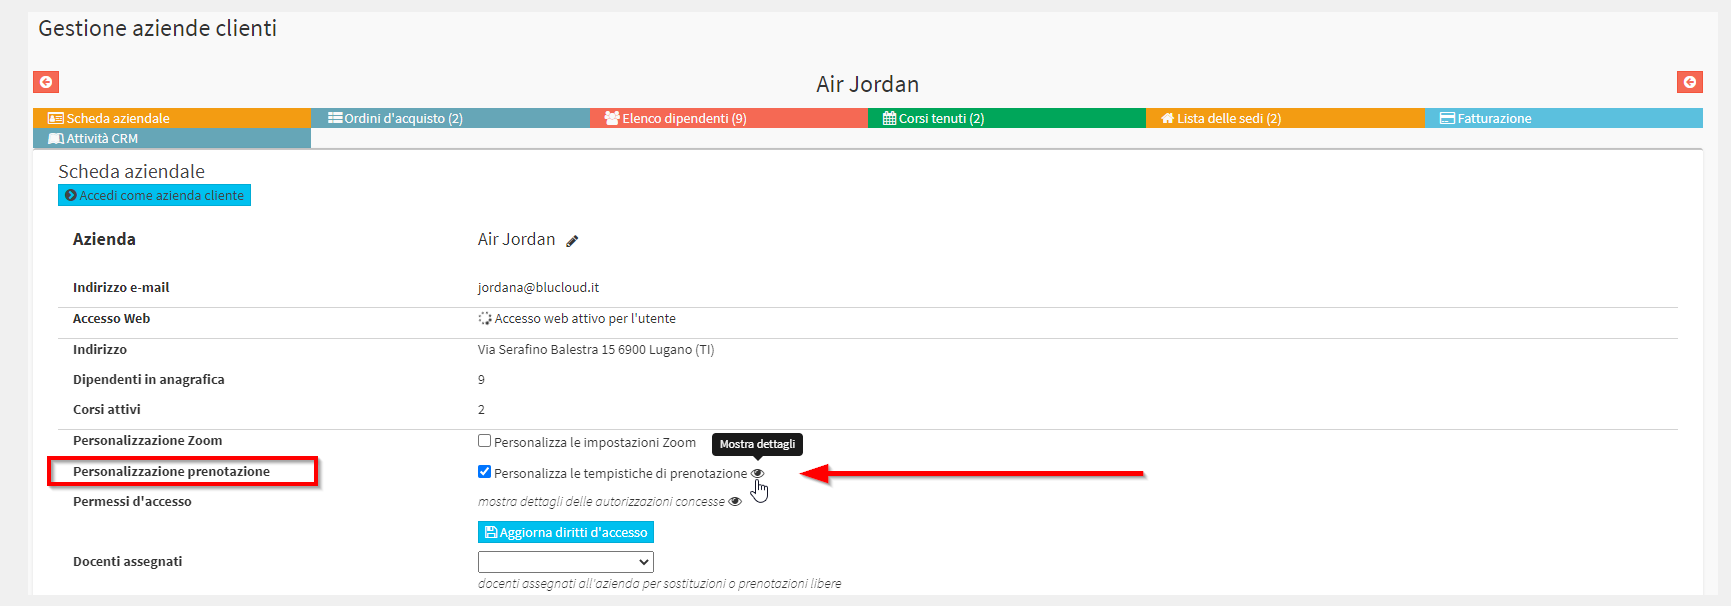
These are general configurations that apply to all flexible courses enabled for autonomous booking of classes by students, which can be overridden by any configurations entered inside a client company's record, which will apply to all courses linked to it, overriding the general settings.
To make this additional configuration navigate to Master Data → Customer Companies and click on the name of the specific company.
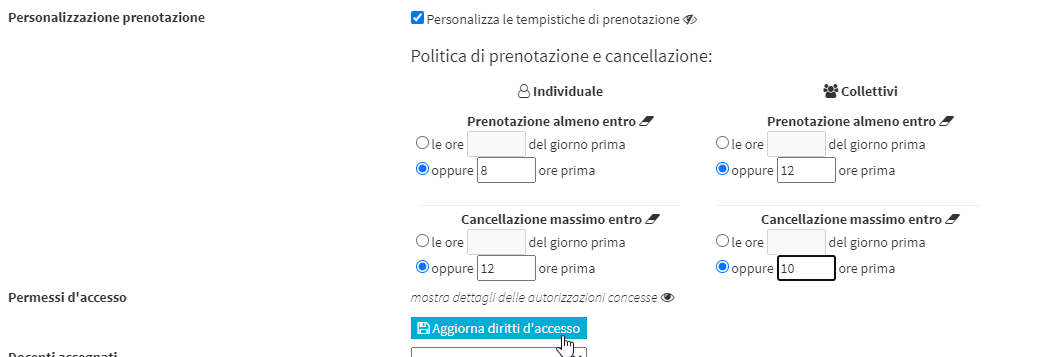
Then enter the checkmark "Booking Customization" and click below on the symbol with the eye next to it to view all booking timing configurations


After filling in the required fields, click the light blue button "Update access rights" to save the operation.
The configurations entered in the specific company will then override the general ones entered in the general student settings.
2. Enabling classrooms
Navigate to Master Data → Classrooms and click the edit button on its row. From the next screen, enter the checkmark "Bookable for classes" to allow students and faculty to book their own classes.

N.B. Teachers, when scheduling a new lesson, if the relevant parameter has been activated, will have the opportunity to choose one of the classrooms that have been enabled by the school, based on the availability of those classrooms (there will always be a check by the system that will prevent teachers from scheduling lessons in already occupied classrooms).
Students, on the other hand, will not have a way to choose a classroom when booking, but it will be chosen by the system automatically based on availability.
3. Enabling flexible course
Navigate to Didactics → Individual Lessons (or Didactics → Courses in case the two course sections have been merged).
Enter the edit tab of an existing flexible/intensive individual course and enter the checkmark "The student can plan his or her own lessons independently".

In addition, if the school would like to enable this permission for the student, by entering the checkmark "The student may choose an alternative teacher for the individual lesson", it will allow the user to choose an alternative lecturer to the one assigned to their course, thus also displaying the availability of other lecturers (related to the same subject)
WARNING
- The course is to be INDIVIDUAL
- The course should be FLEXIBLE/INTENSIVE.
- the duration of the course should be configured with a predetermined number of LESSONS and the duration of the lesson should be defined, or with a predetermined number of HOURS
4. Lesson Reservation via Student Web Account.
In case it is necessary to carry out some tests of the student account with the flexible course enabled for autonomous class booking, it will be useful to log in to the system as a user. Please click here to access the specific guide.
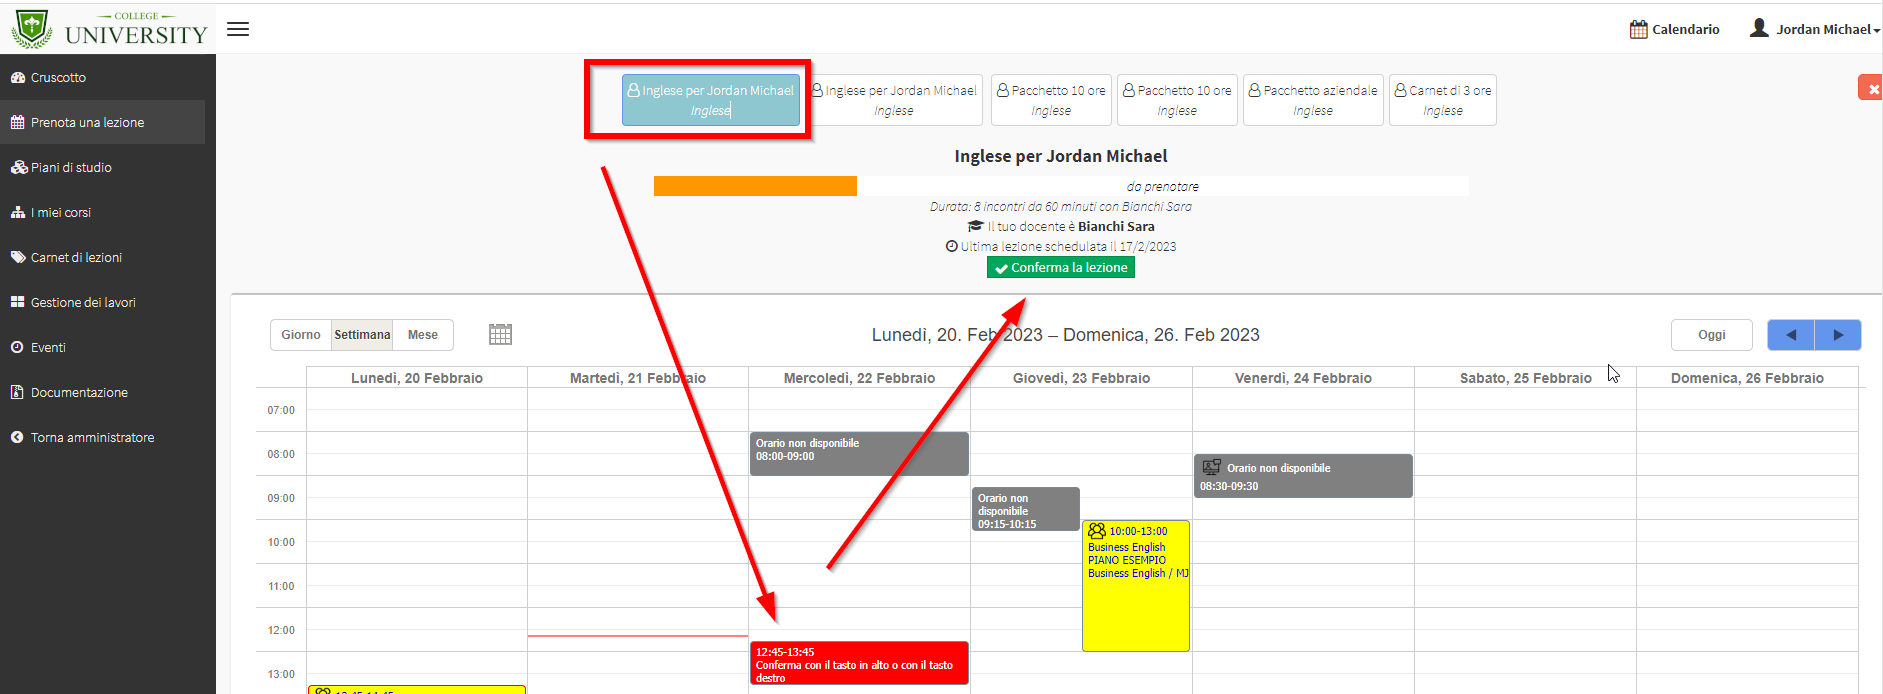
Enter the section Lesson Reservation from the left menu of the student account dashboard to access the calendar.

On the next page related to the calendar, simply click on the course name at the top in case there are multiple courses or packages that can be used by the student, and below double left click on an empty spot on the calendar, or single left click and drag down, and below click the green button at the top "Confirm Lesson".

The teacher or secretary, in case the configuration option has been chosen that assumes confirmation of the lesson booked by the student, will receive the request from the student by email and, by browsing the calendar and right-clicking on the booked lesson, will have a way to confirm it.

After confirming, the student will be notified by email.
5. Booking the lesson via Student APP
From their App, the student should click on the tab courses and press on the flexible course of interest and then on Request new lesson:
It will be necessary to select the date of interest:

And following timetable:

The lesson will be created in the calendar, confirm with Request Lesson:

The final summary will appear, further confirm with OK if the lesson will now be officially created.
