6.1 - Planning the lessons of the course.
→ Download this guide in PDF format![]()
From the list of courses click the icon Show classroom occupancy ![]() Of the course concerned.
Of the course concerned.
From the next screen, click the Weekly schedule change.
The system then displays the calendar with weekly view, pre-filtering the location indicated when creating the course.

The system displays the first classroom found in the location defined when creating the course. It is then possible to add more classrooms to the calendar using the search filter at the top and then clicking the Update. The classrooms will then be displayed side by side in the calendar columns, just below the days.
Calendar description
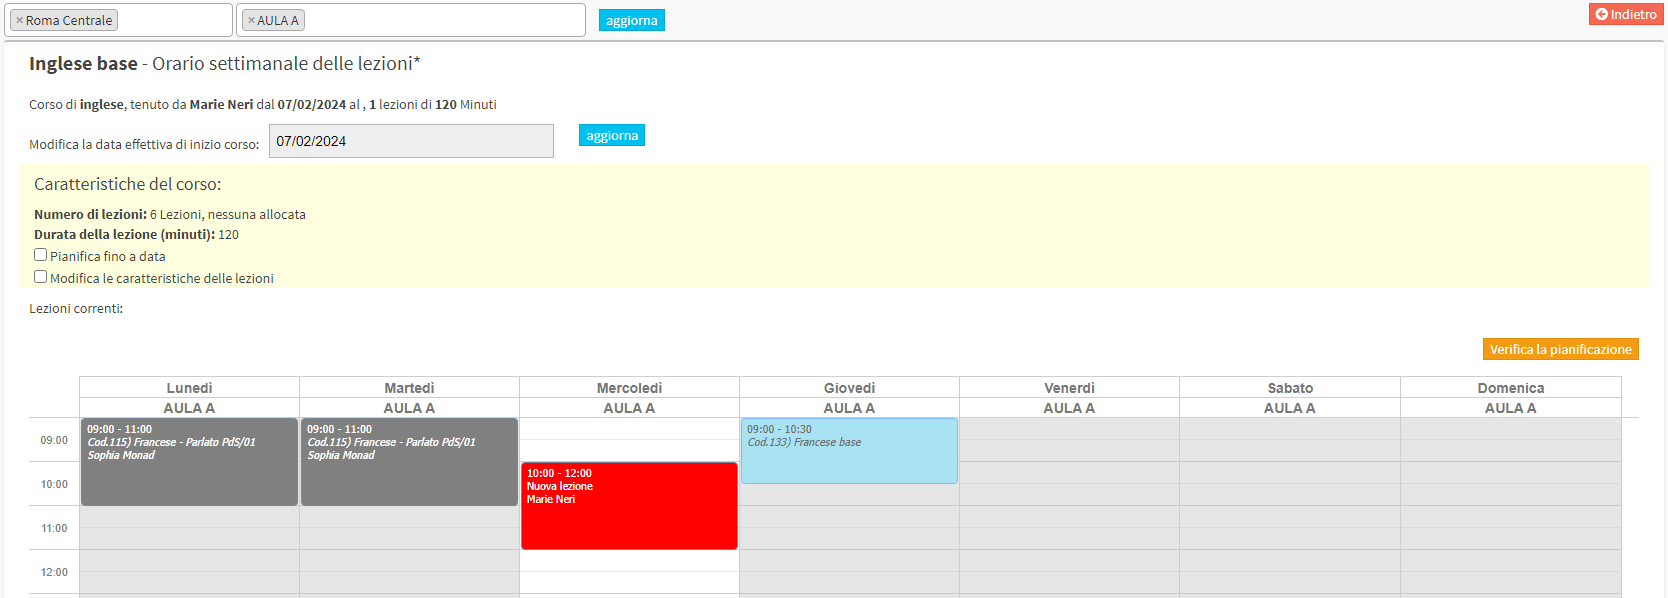
The calendar shows the schedule vertically and the days of the week and selected classrooms horizontally. The class day (set to Course Start Date when creating the course) is the only one enabled for editing and is highlighted with a white background (in the image above it is Thursday). The other days have gray background color and are not enabled for editing.
The course start date can still be changed by entering it in the appropriate field above the calendar and then clicking Update.
As in the image above, existing lectures are shown in the calendar: gray shows weekly lectures scheduled in the classroom for other courses while light blue shows times when the lecturer has other courses in other classrooms.
In red, on the other hand, the lectures for the course that is currently being scheduled are shown.
To create a new lesson double-click in a spot on the calendar or drag the mouse pointer. The system creates the red lesson box and automatically sizes it according to the lesson duration set when creating the course. To move the lesson to another time or classroom drag it while holding down the mouse pointer.
Attention: the weekly course schedule must reflect the frequency set when creating the course (e.g.: one lesson per week). As a result, the system will not allow saving until the frequency is met.If you want to change the frequency of lessons (e.g.: from one to two lessons per week), you need to go back into course editing and set the field differently Lessons per week.
Click the "Check Schedule" to check that there are no classroom and/or lecturer conflicts in the chosen schedule, in case they are already occupied for other courses; then click "Go to approval".
At this point the preview of the class calendar will be shown; click the button Apply Changes to save the data.