Configuring the enrollment contract via ODT template
IMPORTANT: The file must be in .odt format and not .doc, so the use of word is not recommended. Instead, it is highly recommended to use Openoffice
This mini-guide on configuring the school enrollment contract from ODT template, is divided into the following paragraphs:
- INTRODUCTION
- PLACEHOLDER DEFINITION
- PLACEHOLDER LISTS
- PLACEHOLDERS IN TABLES
- CONDITIONAL BLOCKS
- FILTERS
- LIST OF AVAILABLE PLACE CARDS
- UPLOADING ODT TEMPLATE TO SYSTEM
- USE OF THE CONTRACT TEMPLATE
- EXAMPLES OF USE
1. INTRODUCTION
In the direction of allowing the individual school autonomous management of certificates, certificates, reports and other documents, the system allows for the preparation and activation of documents in total autonomy, which will then be exportable for each course and for each student enrolled in the courses.
The report will have to be a template in .odt format, i.e., OpenOffice, the content will be able to integrate dynamic content through the use of placeholders responsive to a predefined syntax, being able to choose from an extensive list of entities and attributes that will allow documents of various types to be generated.
The system will also allow access to custom fields of courses and users, or to insert tables to list enrollees, with a rather simple syntax, allowing rather rich documents to be generated.
The generation of a report from odt template enables the generation of documents in Open Document Text format (ODF text document, .odt extension), containing dynamic information, using an .odt file, called a template, in which appropriate placeholders are inserted, which, in the final generated document, will be replaced by the value indicated by the placeholder.
WARNING: template refers, in the context of this documentation, to a normal .odt file containing placeholders, the file must be in ODF text document format, extension .odt.
The template for generating the final document, to be uploaded when setting up the report, is a normal odt document, and where there is text, a placeholder can be inserted there, within the normal text flow, even within a table.
This type of report can be linked to a course, to a student in a course, or to a teacher in a course and allows for the generation of certificates, certificates, and reports on the course; it can also be linked to a student in the student registry to generate enrollment forms, for example, or to a teacher in the teacher registry to generate a letter of assignment; another possible use is as a contract template, to be used in order management.
2. DEFINITION OF PLACEHOLDERS
La sintassi per definire un segnaposto è {oggetto.attributo}, il nome dell’oggetto è la parte del nome a sinistra del punto, il nome dell’attributo è la parte a destra del punto; quindi, ad esempio, per mostrare nel documento finale il nome del corso si usa {course.name}, per mostrare la sede del corso si usa {location.location}.
If the name of the object is plural, in English, it means that it is a list of values, which can be used within a table or to create a list of values in the final document, using an appropriate syntax to indicate the beginning and end of the list; the list of placeholders below indicates when a placeholder is a list.
Some placeholders, e.g. course, students, students, teachers, possess an attribute that has a different behavior, the customfields attribute, the syntax of which is {object.customfields[code]}, which is used to show the value of a custom field, e.g., to show the value of the custom field of the course with code _LEVEL, we use {course.customfields[_LEVEL]}.
To summarize, if we wanted to show the name, code, location, and custom field _Level, of the course:
{course.name}
{course.code}
{location.location}
{course.customfields[_LEVEL]}
3. LISTS OF PLACEHOLDERS
The syntax for using a list of values, involves indicating where the list begins and where it ends; in the block of text enclosed between the two markers, placeholders are inserted to show the values of each list item, for example, to list the full names and email address of each student in the course:
[! -- BEGIN students --]
{students.fullName} {students.email}
[!-- END students --]
the line between [!-- BEGIN students --] e [!-- END students --] will be repeated for each student, in the final document.
Two special placeholders are available for each list item, _position, the position of the item in the list, and _total, the total number of items in the list.
If it becomes necessary to insert two identical lists within the same document, it will be possible to do so by inserting an underscore ( _ ) in the placeholder of the second list
[!-- BEGIN students_ --]
{students_.fullName} {students_.email}
[!-- END students_ --]
4. PLACEHOLDERS IN TABLES
The syntax for using a list of values within a table involves indicating where the table row begins and where it ends; in the block of text enclosed between the two markers, placeholders are inserted to show the values of each item in the list, e.g., to list the full names, email address, and mobile phone of each student in the course, within a table:
|
{students.email}
|
{students.mobile}
|
the table row between [!-- BEGIN row.students --] e [!-- END row.students --] will be repeated for each student, in the table of the final document.
If it becomes necessary to insert two identical lists within the same document, it will be possible to do so by inserting an underscore ( _ ) in the placeholder of the second list
|
{students_.email}
|
{students_.mobile}
|
5. CONDITIONAL BLOCKS
The conditional block is a part of the document, delimited by appropriate markers, with which a condition is associated, which can be true or false; if true, the contents of the block are included in the final document; if false, the contents of the block are removed from the final document.
One of the defined custom fields or the conditions given in the CONDITION section of the list of available placeholders can be used as a condition for the block.
The condition using a custom field is true if the field is valorized, it is false if it is empty.
The syntax for defining the conditional block involves stating the beginning and end of the block, indicating the associated condition, e.g., to define a conditional block to be shown only if the order is discounted:
[!-- IF order.isDiscounted --]
Sconto: {order.discount}
[!-- ENDIF order.isDiscounted --]
order.isDiscounted is the condition, if it is true the order is discounted and the discount applied is shown, if it is false the order is not discounted and the discount line will not be included in the final document.
You can reverse the condition check by adding NOT to the syntax to define the conditional block, for example, to define a conditional block to be shown only if the order is not discounted:
[!-- IF NOT order.isDiscounted --]
Discount not applicable.
[!-- ENDIF NOT order.isDiscounted --]
order.isDiscounted is the condition, if it is true the order is discounted and the text "Discount not applicable" will not be shown in the final document, if it is false the order is not discounted and therefore the text "Discount not applicable" will be shown in the final document.
To use a custom field as a condition use the following syntax:
[!-- IF student.customfields[CERTIFICAZIONI] --]
Certifications: {student.customfields[CERTIFICATIONS]}
[!-- ENDIF student.customfields[CERTIFICAZIONI] --]
the row within the block will be shown only the student's certifications have been indicated, that is, if the custom field with code CERTIFICATIONS of the student is not empty.
6. FILTERS
Filters allow an operation to be performed that changes the value of the individual placeholder entered in the document and are available for any type of odt report, regardless of section.
The available filters are as follows:
- cut allows us to limit the length of a text within the given value, for example to limit the length of the course name to a maximum of 5 characters we can use the placeholder {course.name|cut[5]}
- daysbefore allows us to compute a date earlier than the date of the valorized placeholder, e.g. if we want to get the date corresponding to 2 weeks before the start of the course we can use the placeholder {course.startDate|daysbefore[14]}
- daysafter allows us to compute a date later than the date of the valorized placeholder, for example if we want to get the date corresponding to 1 week after the start of the course we can use the placeholder {course.startDate|daysafter[7]}
- lowercase changes the value of the placeholder to lowercase, for example to show the course name all in lowercase use the placeholder {course.name|lowercase}
- uppercase changes the value of the placeholder to uppercase, e.g. to show the course name all in uppercase use the placeholder {course.name|uppercase}
- uppercasefirst changes the value of the placeholder by capitalizing the first letter, e.g. to show the course name with the first letter capitalized use the placeholder {course.name|uppercasefirst}
If two versions of the same placeholder are needed in the document, one filtered and one unfiltered, simply add a _ (underscore) to the second occurrence of the placeholder, e.g., use {course.name|cut[5]} to show the abbreviated course name and {course_.name} to show the full course name later.
7. LIST OF PLACEHOLDERS AVAILABLE FOR CONTRACT TEMPLATES.
Branch placeholders
Data related to the School branch, for management systems that manage more than one branch.| SIGNAGE | VALUE | NOTES |
|---|---|---|
| {branch.code} | branch code | |
| {branch.description} | branch description | |
| {branch.name} | branch name |
Placeholder report
Report data| SIGNAGE | VALUE | NOTES |
|---|---|---|
| {report.parameters[name]} | possible parameter |
Placeholder configuration
Configuration data| SIGNAGE | VALUE | NOTES |
|---|---|---|
| {configuration.settinga[name]} | configuration parameter value |
Placeholder company order section
Data of the company issuing the invoice. The companies in question are those configured in the management system under Tax Management → Tax Settings| SIGNAGE | VALUE | NOTES |
|---|---|---|
| {company.address} | address | |
| {company.cap} | zip code | |
| {company.city} | city | |
| {company.country} | country code | |
| {company.countryCode} | country iso code | |
| {company.email} | ||
| {company.mobile} | mobile phone | |
| {company.name} | business name | |
| {company.phone} | landline | |
| {company.provinces} | provinces | |
| {company.taxcode} | tax code | |
| {company.vatnumber} | VAT number | |
| {company.description} | Descrizione della società | |
| {company.paymentMethod} | Payment methods |
Placeholder contractor order section
contractor data available in the order section, if the student is an adult the contractor information is enhanced with the student's data, if the student is a minor the contractor information is enhanced with the parent/guardian's data.| SIGNAGE | VALUE | NOTES |
|---|---|---|
| {contractor.address} | home address | |
| {contractor.birthdate} | date of birth | |
| {contractor.birthday} | birthday | |
| {contractor.birthplace} | place of birth | |
| {contractor.birthprovince} | province of birth | |
| {contractor.cap} | zip code of the residence | |
| {contractor.city} | city of residence | |
| {contractor.country} | country of residence | |
| {contractor.country} | iso code of country of residence | |
| {contractor.customfields[]} | custom field | The custom field code should be indicated between the square brackets |
| {contractor.citizenship} | citizenship | |
| {contractor.passport} | passport | |
| {contractor.email} | ||
| {contractor.fullName} | call sign | |
| {contractor.gender} | genre | |
| {contractor.maritalstatus} | marital status | |
| {contractor.profession} | profession | |
| {contractor.qualification} | qualification | |
| {contractor.id} | identifier | |
| {contractor.cardnumber} | Cardholder number | Valued only if the holder is the student |
| {contractor.invoiceDataAddress} | address (billing) | Valued in case the master data includes billing data other than residence data |
| {contractor.invoiceDataCity} | city (billing) | Valued in case the master data includes billing data other than residence data |
| {contractor.invoiceDataCountry} | Country (billing) | Valued in case the master data includes billing data other than residence data |
| {contractor.invoiceDataEmail} | Email (billing) | Valued in case the master data includes billing data other than residence data |
| {contractor.invoiceDataFiscalCode} | Tax code (billing) | Valued in case the master data includes billing data other than residence data |
| {contractor.invoiceDataMobilePhone} | Mobile number (billing) | Valued in case the master data includes billing data other than residence data |
| {contractor.invoiceDataName} | Name/Company (billing) | Valued in case the master data includes billing data other than residence data |
| {contractor.invoiceDataPec} | Pec (billing) | Valued in case the master data includes billing data other than residence data |
| {contractor.invoiceDataPhone} | landline phone (billing) | Valued in case the master data includes billing data other than residence data |
| {contractor.invoiceDataProvince} | Province (billing) | Valued in case the master data includes billing data other than residence data |
| {contractor.invoiceDataRecipientCode} | Recipient code (billing) | Valued in case the master data includes billing data other than residence data |
| {contractor.invoiceDataVatNumber} | VAT number (billing) | Valued in case the master data includes billing data other than residence data |
| {contractor.invoiceDataZipCode} | ZIP code (billing) | Valued in case the master data includes billing data other than residence data |
| {contractor.mobile} | mobile phone | |
| {contractor.name} | name | |
| {contractor.pec} | certified e-mail address | |
| {contractor.phone} | landline | |
| {contractor.province} | province of residence | |
| {contractor.relation} | relationship with the student | Valued only if the contractor is different from the student, i.e., in the case of a minor student |
| {contractor.surname} | surname | |
| {contractor.taxcode} | tax code | |
| {contractor.vatnumber} | VAT number | |
| {contractor.notes} | notes | |
| CONDITION | VALUE | NOTES |
| contractor.isAdult | true if the contractor is of age, false otherwise | |
| contractor.isNotAdult | true if the contractor is a minor, false otherwise |
Placeholder course order section
course related data order section, placeholder valued only if there is only one course in the order, if there is a course template in the order the data is retrieved from the course template| SIGNAGE | VALUE | NOTES |
|---|---|---|
| {course.booksTitleList} | textbooks | each title is separated by comma from the next, not valued if course model |
| {course.certificateEndLevel} | Certified course arrival level | |
| {course.certificateStartLevel} | certified starting level of the course | |
| {course.code} | code | |
| {course.cost} | cost | |
| {course.costIfInstallments} | cost if payment in installments | Valued only if an installment plan is attached to the course/model |
| {course.customfields[]} | custom field | in square brackets should be the custom field code, valorized only if it is a course, not valorized in case of course template |
| {course.endDate} | end date | not valued if course model |
| {course.duration} | course duration | Can be given in hours, lessons, or as a start and end date |
| {course.enrolledStudents} | number of students enrolled | |
| {course.firstInstallmentAmount} | first installment amount | Valued only if an installment plan is attached to the course/model |
| {course.firstInstallmentDate} | first installment due date | Valued only if an installment plan is attached to the course/model |
| {course.firstInstallmentDay} | day of the month first installment due | Valued only if an installment plan is attached to the course/model |
| {course.firstInstallmentMonth} | month first installment of any installment plan | |
| {course.first installmentMonth} | first installment due month | Valued only if an installment plan is attached to the course/model |
| {course.hours} | total lecture hours of the course | |
| {course.studyHours} | ore in aula | |
| {course.trainingHours} | ore tirocinio | |
| {course.installmentsNumber} | number of installments | Valued only if an installment plan is attached to the course/model |
| {course.internalEndLevel} | Internal arrival level of the course | |
| {course.internalEndLevelDescription} | description of the internal arrival level | |
| {course.internalStartLevel} | Internal starting level of the course | |
| {course.internalStartLevelDescription} | description of the internal level of initiation | |
| {course.lessons} | number of lessons | |
| {course.lessonsDuration} | lesson duration, set only if regular course, in minutes | |
| {course.lessonsEndTime} | final class schedule | Valued only if Group course with one class per week. Not valued if course model |
| {course.lessonsPerWeek} | number of lessons per week | |
| {course.lessonsStartTime} | initial class schedule | Valued only if Group course with one class per week. Not valued if course model |
| {course.lessonsWeekDay} | lessons, day of the week | Valued only if Group course with one class per week. Not valued if course model |
| {course.lessonsWeekSchedule} | classes, days of the week and schedule | Valued if more than one class per week, not valued if course model |
| {course.installmentsAdvanceAmount} | Amount to be paid to the order in case of installment payment | Valued only if an installment plan is attached to the course/model |
| {course.locationCompleteAddress} | full course venue address | not valued if course model |
| {course.locationName} | course venue name | not valued if course model |
| {course.model} | template name used to create the course | |
| {course.name} | name | |
| {course.plannedHours} | planned class hours | |
| {course.startDate} | start date | not valued if course model |
| {course.studentsFullNameList} | student list, the separator is the comma | |
| {course.subject} | subject of study | valued only if single subject course |
| {course.subjectAlias} | aka subject of study | valued only if single subject course |
| {course.teachersFullNameList} | teachers' names | each callsign is separated by comma from the next, not valued if course model |
| {course.teachingYear} | academic year | not valued if course model |
| {course.type} | Tipologia corso | Individuale o collettivo |
| {course.fundName} | linked fund | Valued only if present for Invoice templates |
| {course.locationCode} | venue code | Valued only if present for Invoice templates |
Placeholder coursePackets order section
course package data order section, list| SIGNAGE | VALUE | NOTES |
|---|---|---|
| {coursePackets.cost} | cost | |
| {coursePackets.name} | package name | |
| {coursePackets.periods} | package duration | |
| {coursePackets.type} | unit of measurement of package duration | months, hours or lessons |
| {coursePackets._position} | position of the item in the list | |
| {coursePackets._total} | total number of items in the list |
Courses placeholders order section
course data order section, if course templates are present in the order the data are retrieved from the course templates, list| SIGNAGE | VALUE | NOTES |
|---|---|---|
| {courses.booksTitleList} | textbooks | each title is separated by comma from the next, not valued if course model, not valued if course model |
| {courses.certificateEndLevel} | Certified course arrival level | |
| {courses.certificateStartLevel} | certified starting level of the course | |
| {courses.code} | code | |
| {courses.cost} | cost | |
| {courses.costIfInstallments} | cost if payment in installments | Valued only if an installment plan is attached to the course/model |
| {courses.customfields[]} | custom field | in square brackets should be the custom field code, valorized only if it is a course, not valorized in case of course template |
| {course.duration} | course duration | Can be given in hours, lessons, or as a start and end date |
| {courses.endDate} | end date | not valued if course model |
| {course.enrolledStudents} | number of students enrolled | |
| {courses.firstInstallmentAmount} | first installment amount | Valued only if an installment plan is attached to the course/model |
| {courses.firstInstallmentDate} | first installment due date | Valued only if an installment plan is attached to the course/model |
| {courses.firstInstallmentDay} | day of the month first installment due | Valued only if an installment plan is attached to the course/model |
| {courses.first installmentMonth} | first installment due month | Valued only if an installment plan is attached to the course/model |
| {courses.hours} | total lecture hours of the course | |
| {courses.studyHours} | ore in aula | |
| {courses.trainingHours} | ore tirocinio | |
| {courses.installmentsAdvanceAmount} | Amount to be paid to the order in case of installment payment | Valued only if an installment plan is attached to the course/model |
| {courses.installmentsNumber} | number of installments | Valued only if an installment plan is attached to the course/model |
| {course.internalEndLevel} | Internal arrival level of the course | |
| {course.internalEndLevelDescription} | description of the internal arrival level | |
| {course.internalStartLevel} | Internal starting level of the course | |
| {course.internalStartLevelDescription} | description of the internal level of initiation | |
| {courses.lessons} | number of lessons | |
| {course.lessonsDuration} | lesson duration, set only if regular course, in minutes | |
| {courses.lessonsEndTime} | final class schedule | valued only if one class per week, not valued if course model |
| {courses.lessonsStartTime} | initial class schedule | valued only if one class per week, not valued if course model |
| {course.lessonsPerWeek} | number of lessons per week | |
| {course.lessonsStartTime} | initial class schedule | Valued only if Group course with one class per week. Not valued if course model |
| {courses.lessonsWeekDay} | lessons, day of the week | valued only if one class per week, not valued if course model |
| {courses.lessonsWeekSchedule} | classes, days of the week and schedule | Valued if more than one class per week, not valued if course model |
| {courses.locationCompleteAddress} | full course venue address | not valued if course model |
| {courses.locationName} | course venue name | not valued if course model |
| {course.model} | template name used to create the course | |
| {courses.name} | name | |
| {course.plannedHours} | planned class hours | |
| {courses.startDate} | start date | not valued if course model |
| {course.studentsFullNameList} | student list, the separator is the comma | |
| {courses.subject} | subject of study | valued only if single subject course |
| {courses.subjectAlias} | Aliases subject of study | valued only if single subject course |
| {courses._position} | position of the item in the list | |
| {courses.teachersFullNameList} | teachers' names | each callsign is separated by comma from the next, not valued if course model |
| {courses._total} | Total number of items in the list | |
| {course.teachingYear} | academic year | not valued if course model |
| {course.type} | tipologia corso | Individuale o collettivo |
Placeholder currentDate
data for the current date| SIGNAGE | VALUE | NOTES |
|---|---|---|
| {currentDate.date} | current date | |
| {currentDate.day} | current day | 01 to 31 |
| {currentDate.year} | current year | |
| {currentDate.month} | current month | 1 to 12 |
| {currentDate.monthName} | current month name | |
| {currentDate.weekDay} | day of the week |
Placeholder customerCompany orders section
customer company data order section| SIGNAGE | VALUE | NOTES |
|---|---|---|
| {customerCompany.address} | address | |
| {customerCompany.cap} | zip code | |
| {customerCompany.city} | city | |
| {customerCompany.country} | country | |
| {customerCompany.countryCode} | country code | |
| {customerCompany.email} | ||
| {customerCompany.mobile} | mobile phone | |
| {customerCompany.name} | business name | |
| {customerCompany.phone} | landline | |
| {customerCompany.province} | province | |
| {customerCompany.taxcode} | tax code | |
| {customerCompany.vatnumber} | VAT number |
Placeholder details order section
elements (rows) of the order section, list| SIGNAGE | VALUE | NOTES |
|---|---|---|
| {details.price} | Original amount (without discounts applied) | amount without any discount applied |
| {details.amount} | amount | amount with any discount applied |
| {details.cost} | cost | |
| {details.code} | Article technical code | |
| {details.description} | description | if the order line is for an individual course the name of the course model is added to the description |
| {details.discount} | possible discount | can come in euros or percentages |
| {details.netAmount} | amount net of vat | amount with any discount applied |
| {details.note} | notes | |
| {details.studentFullName} | student name | |
| {details.type} | type of payment | can be one of "Class attendance," "Card purchase cost," "Other payments," "Refund payments made," or "Post order discount" |
| {details.vat} | vat rate | |
| {details.vatAmount} | vat amount | |
| {details._position} | position of the item in the list | |
| {details._total} | total number of items in the list | |
| {details.cardnumber} | Show the membership card number if it is provided | |
| {details.studyPlanName} | name of the curriculum | |
| {details.studyPlanCode} | curriculum code | |
| {details.studyPlanYear} | year of the curriculum | |
| {details.studyPlanSubjects} | subjects chosen for that curriculum |
Placeholder downPayment orders section
down payment| SIGNAGE | VALUE | NOTES |
|---|---|---|
| {downPayment.amount} | amount | |
| {downPayment.expiry} | expiration date | |
| CONDITION | VALUE | NOTES |
| {downPayment.isPaid} | true if down payment paid, false otherwise |
Placeholder goodsServices order section
goods/services of the order sections orders, list| SIGNAGE | VALUE | NOTES |
|---|---|---|
| {goodsServices.name} | name | |
| {goodsServices.description} | description | |
| {goodsServices.price} | price | |
| {goodsServices._position} | position of the item in the list | |
| {goodsServices._total} | total number of items in the list |
Placeholders installments order section
pagamenti rateizzati dell'ordine sezione ordini, listaaggiungere numero rata per specificare la singola rata es. {installments2.amount} riporterà l'importo della seconda rata
| SIGNAGE | VALUE | NOTES |
|---|---|---|
| {installments.amount} | installment amount | |
| {installments.description} | description | if payment in installments the description is "Installment x of y", if payment out of installments the description of the order line is given |
| {installments.expiry} | expiration date | |
| {installments.number} | installment number | |
| {installments.paid} | if paid | |
| {installments.paymentDate} | date of payment | |
| {installments.remaining} | amount still to be paid | |
| {installments.totalInstallmentAmount} | importo totale della rata compreso di bollo | |
| {installments.stampAmount} | stamp amount | |
| {installments.status} | installment status | can be one among "PAID on" followed by the date of payment, "To be paid", "Cancelled" or ""Abandoned" |
| {installments._position} | position of the item in the list | |
| {installments._total} | total number of items in the list | |
| {installments.expectedMethod} | Metodo di pagamento atteso | |
| CONDITION | VALUE | NOTES |
| installments.isAbandoned | true if the installment is abandoned, false otherwise | |
| installments.isCanceled | true if the installment is cancelled, false otherwise | |
| installments.isNotPaid | true if the installment is due, false otherwise | |
| installments.isPaid | true if the installment is paid, false otherwise | |
| installments.isPartiallyPaid | true if the installment is partially paid, false otherwise |
Placeholder lessonPackets order section
class packages of the order sections, list| SIGNAGE | VALUE | NOTES |
|---|---|---|
| {lessonPackets.name} | lesson package name | |
| {lessonsPackets.cost} | cost | |
| {lessonsPackets.hours} | class hours | |
| {lessonsPackets.minutesPerHours} | length of class hour | in minutes |
| {lessonsPackets.type} | like | 1 if open package, 0 otherwise |
| {lessonsPackets._position} | position of the item in the list | |
| {lessonsPackets._total} | total number of items in the list |
Placeholder membership order section
order sections membership card| SIGNAGE | VALUE | NOTES |
|---|---|---|
| {membership.cost} | cost | |
| {membership.description} | description | |
| {membership.studentFullName} | student last name and first name |
Placeholder model order section
course template of the order sections, valued if there is only one course template in the order| SIGNAGE | VALUE | NOTES |
|---|---|---|
| {model.cost} | model name | |
| {model.rate} | monthly cost |
Placeholder models order section
course templates of the order sections, list, valued only if there are multiple course templates in the order| SIGNAGE | VALUE | NOTES |
|---|---|---|
| {models.cost} | model name | |
| {models.rate} | monthly cost | |
| {models._position} | position of the item in the list | |
| {models._total} | total number of items in the list |
Placeholder order section
order data order sections| SIGNAGE | VALUE | NOTES |
|---|---|---|
| {order.advanceAmount} | down payment | |
| {order.amount} | total order amount | |
| {order.amountWithStamp} | Importo totale dell'ordine compreso di bollo | |
| {order.amountPaid} | amount paid | |
| {order.amountPaidOnOrder} | amount paid on order | |
| {order.amountToPay} | amount still to be paid | |
| {order.code} | code | |
| {order.customfields[]} | custom field | The custom field code should be indicated between the square brackets |
| {order.date} | date | |
| {order.onlyFinalOrderDiscount} | sconto applicato all'intero ordine | (esclude eventuali sconti applicati ai singoli articoli) |
| {order.discount} | sconto totale | (riepiloga tutti gli sconti applicati, quelli al dettaglio e quelli generali) |
| {order.discountDescription} | description of the discount | Grouping of global discount description, order detail and post-order discount |
| {order.firstInstallmentAmount} | first installment amount | valued only if installment payment |
| {order.firstInstallmentDate} | first installment due date | valued only if installment payment |
| {order.installmentsAmount} | total installment amount | valued only if installment payment |
| {order.installmentsCounter} | number of installments | valued only if installment payment |
| {order.installmentsFirstMonth} | first installment due month | valued only if installment payment |
| {order.note} | notes | |
| {order.paymentsCounter} | number of payments made | |
| {order.paymentMethodsList} | list of payment methods used to pay for the order | |
| {order.progressive} | sequence number | |
| {order.status} | payment status | can be 0 in case of payment to be made, 1 in case of payment to be approved, or 2 in case of payment made |
| {order.teachingYear} | academic year of the order | Valued only if Order numbering is linked to the teaching year. |
| {order.type} | like | can be 0 in case of enrollment, 1 in case of renewal, 2 in case of transfer, 3 in case of credit note, 4 in case of refund, 5 in case of disenrollment, or 6 in case of pre-enrollment |
| {order.year} | year | |
| {order.expectedPaymentMethod} | expected method of payment | |
| {order.containsdigitalsign} | 1 if electronic signature required, otherwise 0 | |
| {order.inpresencesign} | 1 if electronically signed contract in the presence of the operator, otherwise 0 | |
| {order.containsdigitalsigned} | 1 if electronically signed contract, otherwise 0 | |
| {order.virtualIban} | Refers to the virtual iban assigned in the order | |
| CONDITION | VALUE | NOTES |
| {order.isAtLeasOneCustomFieldSet} | true if at least one custom order field is valued, false otherwise | |
| {order.areInstallmentsMoreThanOne} | True if the number of installments is greater than 1 | |
| {order.isASingleInstallment} | true if the number of installments is equal to 1 | |
| {order.isDiscounted} | true if order taken for granted, false otherwise | |
| {order.isNotDiscounted} | true if order not obvious, false otherwise | |
| {order.isNotStudentSameAsContractor} | true if the contractor and student are not the same person, false otherwise | |
| {order.isNotVatAdded} | true if the order is without vat, false otherwise | |
| {order.isPartiallyPaid} | true if the order is partially paid, false otherwise | |
| {order.isStudentSameAsContractor} | true if the contractor and student are the same person, false otherwise | |
| {order.isVatAdded} | true if the order is with vat, false otherwise | |
| {order.isWithInstallments} | true if the order is installment, false otherwise | |
| {order.isWithoutInstallments} | True if the order is not installment, false otherwise | |
| {order.totalCoursesNotCarriedOutCost} | refers to the amount deducted from all hours/lessons missed in courses in which the student enrolled (late). | |
| {order.totalCoursesCost} | refers to the original value of all courses in which the student enrolled. The value taken is from a collective regular course and the field involved is monthrate | |
| {order.hasVirtualIban} | True if the order has the virtualIban |
Placeholder payments order section
payments related to the order sections orders, list| SIGNAGE | VALUE | NOTES |
|---|---|---|
| {payments.amount} | amount | |
| {payments.date} | date | |
| {payments.method} | method | valorized with one of the payment methods defined in "Administration" => "Economic settings", "Payment method" group |
| {payments._position} | position of the item in the list | |
| {payments._total} | total number of items in the list | |
| {payaments.totalAmout} | total amount |
Placeholder packageOffers orders section
cumulative offerings of the order sections, list| SIGNAGE | VALUE | NOTES |
|---|---|---|
| {packageOffers.cost} | cost | |
| {packageOffers.name} | name | |
| {packageOffers.note} | notes | |
| {packageOffers.selfSubscription} | autonomous student signing | 1 if the student can enroll independently, 0 otherwise |
| {packageOffers.type} | type of offer | 1 if internal type bid, 0 otherwise |
| {packageOffers._position} | position of the item in the list | |
| {packageOffers._total} | total number of items in the list |
ParentTutor Placeholders
dati del genitore/tutore dello studente a cui è riferito l'ordine:1. Se impostato i dati saranno riferiti al genitore preferito
2. Se NON impostato i dati saranno riferiti al primo dei genitori collegati allo studente
| SIGNAGE | VALUE | NOTES |
|---|---|---|
| {parentTutor.address} | address | |
| {parentTutor.birthdate} | date of birth | |
| {parentTutor.birthday} | birthday | |
| {parentTutor.birthplace} | place of birth | |
| {parentTutor.birthprovince} | province of birth | |
| {parentTutor.cap} | zip code | |
| {parentTutor.city} | city | |
| {parentTutor.country} | country | |
| {parentTutor.countryCode} | country iso code | |
| {parentTutor.citizenship} | citizenship | |
| {parentTutor.passport} | passport | |
| {parentTutor.profession} | profession | |
| {parentTutor.qualification} | qualification | |
| {parentTutor.customfields[]} | custom field | The custom field code should be indicated between the square brackets |
| {parentTutor.email} | ||
| {parentTutor.fullName} | call sign | |
| {parentTutor.gender} | genre | |
| {parentTutor.maritalstatus} | marital status | |
| {parentTutor.id} | identifier | |
| {parentTutor.invoiceDataAddress} | address (billing) | Valued in case the master data includes billing data other than residence data |
| {parentTutor.invoiceDataCity} | city (billing) | Valued in case the master data includes billing data other than residence data |
| {parentTutor.invoiceDataCountry} | Country (billing) | Valued in case the master data includes billing data other than residence data |
| {parentTutor.invoiceDataEmail} | Email (billing) | Valued in case the master data includes billing data other than residence data |
| {parentTutor.invoiceDataFiscalCode} | Tax code (billing) | Valued in case the master data includes billing data other than residence data |
| {parentTutor.invoiceDataMobilePhone} | Mobile number (billing) | Valued in case the master data includes billing data other than residence data |
| {parentTutor.invoiceDataName} | Name/Company (billing) | Valued in case the master data includes billing data other than residence data |
| {parentTutor.invoiceDataPec} | Pec (billing) | Valued in case the master data includes billing data other than residence data |
| {parentTutor.invoiceDataPhone} | landline phone (billing) | Valued in case the master data includes billing data other than residence data |
| {parentTutor.invoiceDataProvince} | Province (billing) | Valued in case the master data includes billing data other than residence data |
| {parentTutor.invoiceDataRecipientCode} | Recipient code (billing) | Valued in case the master data includes billing data other than residence data |
| {parentTutor.invoiceDataVatNumber} | VAT number (billing) | Valued in case the master data includes billing data other than residence data |
| {parentTutor.invoiceDataZipCode} | ZIP code (billing) | Valued in case the master data includes billing data other than residence data |
| {parentTutor.mobile} | mobile phone | |
| {parentTutor.name} | name | |
| {parentTutor.pec} | certified e-mail address | |
| {parentTutor.phone} | landline | |
| {parentTutor.province} | province | |
| {parentTutor.surname} | surname | |
| {parentTutor.taxcode} | tax code | |
| {parentTutor.vatnumber} | VAT number | |
| CONDITION | VALUE | NOTES |
| parentTutor.isAdult | true if parent/guardian is of age, false otherwise | |
| parentTutor.isNotAdult | true if the parent/guardian is a minor, false otherwise | |
| {parentTutor.cardnumber} | number of the card, if any | |
| {parentTutor.notes} | notes |
Placeholders parentsTutors
data of parents/guardians of the order section, list| SIGNAGE | VALUE | NOTES |
|---|---|---|
| {parentsTutors.address} | address | |
| {parentsTutors.birthdate} | date of birth | |
| {parentsTutors.birthday} | birthday | |
| {parentsTutors.birthplace} | place of birth | |
| {parentsTutors.birthprovince} | province of birth | |
| {parentsTutors.cap} | zip code | |
| {parentsTutors.city} | city | |
| {parentsTutors.country} | country | |
| {parentsTutors.countryCode} | country iso code | |
| {parentsTutors.citizenship} | citizenship | |
| {parentsTutors.passport} | passport | |
| {parentsTutors.profession} | profession | |
| {parentsTutors.qualification} | qualification | |
| {parentsTutors.customfields[]} | custom field | The custom field code should be indicated between the square brackets |
| {parentsTutors.email} | ||
| {parentsTutors.fullName} | call sign | |
| {parentsTutors.gender} | genre | |
| {parentsTutors.maritalstatus} | marital status | |
| {parentsTutors.id} | identifier | |
| {parentsTutors.invoiceDataAddress} | address (billing) | Valued in case the master data includes billing data other than residence data |
| {parentsTutors.invoiceDataCity} | city (billing) | Valued in case the master data includes billing data other than residence data |
| {parentsTutors.invoiceDataCountry} | Country (billing) | Valued in case the master data includes billing data other than residence data |
| {parentsTutors.invoiceDataEmail} | Email (billing) | Valued in case the master data includes billing data other than residence data |
| {parentsTutors.invoiceDataFiscalCode} | Tax code (billing) | Valued in case the master data includes billing data other than residence data |
| {parentsTutors.invoiceDataMobilePhone} | Mobile number (billing) | Valued in case the master data includes billing data other than residence data |
| {parentsTutors.invoiceDataName} | Name/Company (billing) | Valued in case the master data includes billing data other than residence data |
| {parentsTutors.invoiceDataPec} | Pec (billing) | Valued in case the master data includes billing data other than residence data |
| {parentsTutors.invoiceDataPhone} | landline phone (billing) | Valued in case the master data includes billing data other than residence data |
| {parentsTutors.invoiceDataProvince} | Province (billing) | Valued in case the master data includes billing data other than residence data |
| {parentsTutors.invoiceDataRecipientCode} | Recipient code (billing) | Valued in case the master data includes billing data other than residence data |
| {parentsTutors.invoiceDataVatNumber} | VAT number (billing) | Valued in case the master data includes billing data other than residence data |
| {parentsTutors.invoiceDataZipCode} | ZIP code (billing) | Valued in case the master data includes billing data other than residence data |
| {parentsTutors.mobile} | mobile phone | |
| {parentsTutors.name} | name | |
| {parentsTutors.pec} | certified e-mail address | |
| {parentsTutors.phone} | landline | |
| {parentsTutors.province} | province | |
| {parentsTutors.surname} | surname | |
| {parentsTutors.taxcode} | tax code | |
| {parentsTutors.vatnumber} | VAT number | |
| {parentsTutors._position} | position of the item in the list | |
| {parentsTutors._total} | total number of items in the list | |
| CONDITION | VALUE | NOTES |
| parentsTutors.isAdult | true if parent/guardian is of age, false otherwise | |
| parentsTutors.isNotAdult | true if the parent/guardian is a minor, false otherwise | |
| {parentsTutors.notes} | notes | |
| {parentsTutors.cardnumber} | number of the card, if any |
Placeholder student order section
order section student data, valued only if there is only one student in the order| SIGNAGE | VALUE | NOTES |
|---|---|---|
| {student.address} | address | |
| {student.birthcountry} | country of birth | |
| {student.birthdate} | date of birth | |
| {student.birthday} | birthday | |
| {student.birthplace} | place of birth | |
| {student.birthprovince} | province of birth | |
| {student.branchId} | Reference branch name | |
| {student.cap} | zip code | |
| {student.cardnumber} | Student ID number | |
| {student.certifiedEmail} | ||
| {student.city} | city | |
| {student.country} | country | |
| {student.countryCode} | country iso code | |
| {student.citizenship} | citizenship | |
| {student.customfields[]} | custom field | The custom field code should be indicated between the square brackets |
| {student.email} | ||
| {student.fullName} | call sign | |
| {student.gender} | genre | |
| {student.id} | identifier | |
| {student.invoiceDataAddress} | Address (billing) | Valued in case the master data includes billing data other than residence data |
| {student.invoiceDataCity} | City (billing) | Valued in case the master data includes billing data other than residence data |
| {student.invoiceDataCountry} | Country (billing) | Valued in case the master data includes billing data other than residence data |
| {student.invoiceDataEmail} | Email (billing) | Valued in case the master data includes billing data other than residence data |
| {student.invoiceDataFiscalCode} | Tax code (billing) | Valued in case the master data includes billing data other than residence data |
| {student.invoiceDataMobilePhone} | Mobile phone(billing) | Valued in case the master data includes billing data other than residence data |
| {student.invoiceDataName} | Name/Company (billing) | Valued in case the master data includes billing data other than residence data |
| {student.invoiceDataPec} | PEC (billing) | Valued in case the master data includes billing data other than residence data |
| {student.invoiceDataPhone} | Landline phone (billing) | Valued in case the master data includes billing data other than residence data |
| {student.invoiceDataProvince} | Province (billing) | Valued in case the master data includes billing data other than residence data |
| {student.invoiceDataRecipientCode} | Recipient code (billing) | Valued in case the master data includes billing data other than residence data |
| {student.invoiceDataVatNumber} | VAT number (billing) | Valued in case the master data includes billing data other than residence data |
| {student.invoiceDataZipCode} | ZIP code (billing) | Valued in case the master data includes billing data other than residence data |
| {student.lastUpdate} | latest change to master data | |
| {student.maritalstatus} | marital status | |
| {student.mobile} | mobile phone | |
| {student.name} | name | |
| {student.pec} | certified e-mail address | |
| {student.phone} | landline | |
| {student.province} | province | |
| {student.passport} | passport | |
| {student.profession} | profession | |
| {student.qualification} | qualification | |
| {student.recipientCode} | addressee code | |
| {student.studLocation} | Reference site | |
| {student.surname} | surname | |
| {student.taxcode} | tax code | |
| {student.vatnumber} | VAT number | |
| CONDITION | VALUE | NOTES |
| student.isAdult | true if the student is of age, false otherwise | |
| student.isNotAdult | true if the student is a minor, false otherwise | |
| {student.notes} | notes | |
| {student.zipCode{ | CAP | per modello Fatture |
Segnaposto students sezione ordini
dati degli studenti dell'ordine sezione ordini, lista| SEGNAPOSTO | VALORE | NOTE |
|---|---|---|
| {students.abilities[]} | skill achieved | The ability code should be indicated in square brackets |
| {students.address} | address | |
| {students.birthcountry} | country of birth | |
| {students.birthdate} | date of birth | |
| {students.birthday} | birthday | |
| {students.birthplace} | place of birth | |
| {students.birthprovince} | province of birth | |
| {students.branchId} | Reference branch name | |
| {students.cap} | zip code | |
| {students.cardnumber} | Card number | |
| {students.certifiedEmail} | ||
| {students.city} | city | |
| {students.citizenship} | citizenship | |
| {students.country} | country | |
| {students.countryCode} | country iso code | |
| {students.customfields[]} | custom field | The custom field code should be indicated between the square brackets |
| {students.email} | ||
| {students.fullName} | call sign | |
| {students.gender} | genre | |
| {students.id} | identifier | |
| {students.invoiceDataAddress} | address (billing) | Valued in case the master data includes billing data other than residence data |
| {students.invoiceDataCity} | city (billing) | Valued in case the master data includes billing data other than residence data |
| {students.invoiceDataCountry} | Country (billing) | Valued in case the master data includes billing data other than residence data |
| {students.invoiceDataEmail} | Email (billing) | Valued in case the master data includes billing data other than residence data |
| {students.invoiceDataFiscalCode} | Tax code (billing) | Valued in case the master data includes billing data other than residence data |
| {students.invoiceDataMobilePhone} | Mobile number (billing) | Valued in case the master data includes billing data other than residence data |
| {students.invoiceDataName} | Name/Company (billing) | Valued in case the master data includes billing data other than residence data |
| {students.invoiceDataPec} | Pec (billing) | Valued in case the master data includes billing data other than residence data |
| {students.invoiceDataPhone} | landline phone (billing) | Valued in case the master data includes billing data other than residence data |
| {students.invoiceDataProvince} | Province (billing) | Valued in case the master data includes billing data other than residence data |
| {students.invoiceDataRecipientCode} | Recipient code (billing) | Valued in case the master data includes billing data other than residence data |
| {students.invoiceDataVatNumber} | VAT number (billing) | Valued in case the master data includes billing data other than residence data |
| {students.invoiceDataZipCode} | ZIP code (billing) | Valued in case the master data includes billing data other than residence data |
| {students.lastUpdate} | ||
| {students.maritalstatus} | marital status | |
| {students.mobile} | mobile phone | |
| {students.name} | name | |
| {students.notes} | notes field | |
| {students.passport} | passport | |
| {students.pec} | certified e-mail address | |
| {students.phone} | landline | |
| {students._position} | position of the item in the list | |
| {students.profession} | profession | |
| {students.province} | province | |
| {students.qualification} | qualification | |
| {students.recipientCode} | addressee code | |
| {students.splitPayment} | ||
| {students.studLocation} | Reference site | |
| {students.surname} | surname | |
| {students.taxcode} | tax code | |
| {students._total} | total number of items in the list | |
| {students.vatnumber} | VAT number | |
| CONDITION | VALUE | NOTES |
| students.isAdult | true if the student is of age, false otherwise | |
| students.isNotAdult | true if the student is a minor, false otherwise |
Placeholder studyPlan order section
curriculum| SIGNAGE | VALUE | NOTES |
|---|---|---|
| {studyPlan.name} | name | |
| {studyPlan.years} | duration | in years |
| {studyPlan.code} | code | |
| {studyplan.firstChoosedSubject} | first subject of choice in the curriculum | |
| {studyplan.subscriptionSubjectsList} | curriculum choice subject list | |
| {studyPlan.yearName} | year of the study plan | |
| {studyPlan.subscriptionYear} | year of enrollment |
TeachingYear placeholders
data for the school year| SIGNAGE | VALUE | NOTES |
|---|---|---|
| {teachingYear.endDate} | final date | |
| {teachingYear.firstLesson} | first lesson date | |
| {teachingYear.lastLesson} | last lecture date | |
| {teachingYear.name} | name academic year | |
| {teachingYear.startDate} | start date |
TeachingYear placeholders (if divided into periods)
Data on the periods into which the school year is divided| SIGNAGE | VALUE | NOTES |
|---|---|---|
| {teachingYear.firstPeriod} | first period name | |
| {teachingYear.firstPeriodStartDate} | starting date first period | |
| {teachingYear.firstPeriodEndDate} | end date first period | |
| {teachingYear.secondPeriod} | second period name | |
| {teachingYear.secondPeriodStartDate} | starting date second period | |
| {teachingYear.secondPeriodEndDate} | final date second period | |
| {teachingYear.thirdPeriod} | third period name | |
| {teachingYear.thirdPeriodStartDate} | starting date third period | |
| {teachingYear.thirdPeriodEndDate} | final date third period | |
| {teachingYear.fourthPeriod} | name fourth period | |
| {teachingYear.fourthPeriodStartDate} | starting date fourth period | |
| {teachingYear.fourthPeriodEndDate} | final date fourth period |
8. UPLOADING THE CONTRACT TEMPLATE TO THE SYSTEM
To enter the enrollment contract template into the system navigate to Configuration → Reports and click the "Add Report".
From the next screen fill in the following fields:
- Name*: the name of the report (e.g. "Standard contract", "Summer course contract", "Language course contract", etc.)
- Description: any description of the enrollment contract
- Report type: choose the option "Contract Template" to be able to upload your own template
- Section in which to show the report *: Orders
- Template extension: OpenOffice Write (.odt)
- Report template: upload the contract template in ODT format.
- Select type: select the type of file extension that the contract should have when downloading or sending to the client, being able to choose from:
- OpenOffice Write (.odt)
- Portable Document Format (.pdf)
- Order *: the order in which the reports are listed (e.g. 1, 2, 3, etc.)
Click the "Add report" to save the operation.
After uploading the template, go into editing the template (by clicking the icon with the edit stick) and check the "Enabled" to enable the export of the report from the courses and click one of the two buttons at the bottom of the page to save the operation.
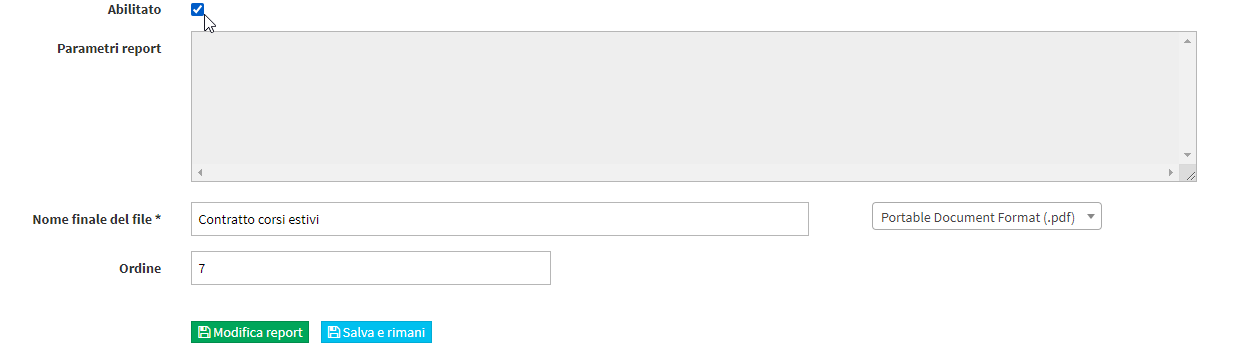
Finally, click the icon ![]() on the line of the uploaded template, to enable the administrative accounts that will be able to use the entered template, either when enrolling or when downloading or sending the contract to the client.
on the line of the uploaded template, to enable the administrative accounts that will be able to use the entered template, either when enrolling or when downloading or sending the contract to the client.
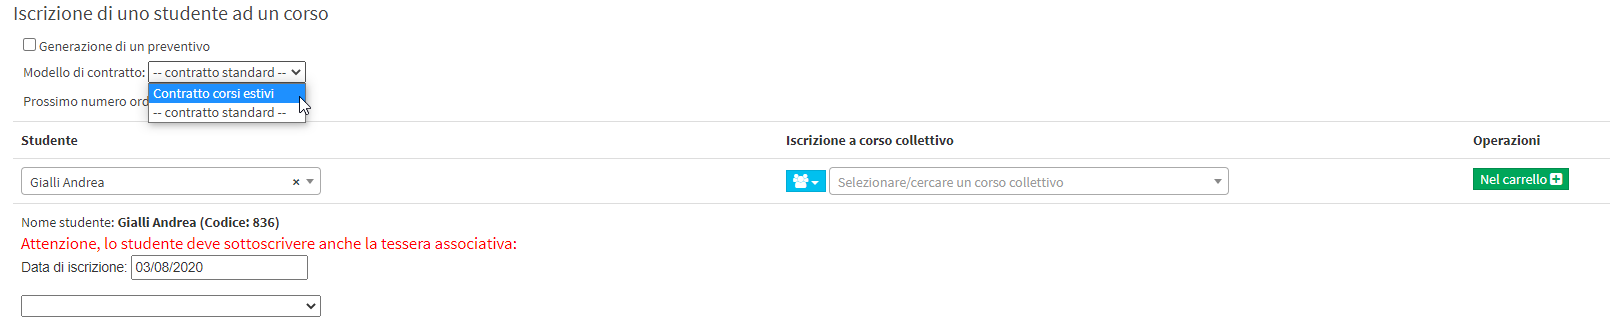
9. USE OF THE MODEL CONTRACT
During the student's enrollment, very simply, it will be possible to choose which contract template to use from those entered and enabled, and then proceed with the ordinary issuance of the order.
Next, navigate to the menu item Financial Management → Order Management, under "Contract Model", the system will indicate the contract template that was chosen when the student was enrolled.
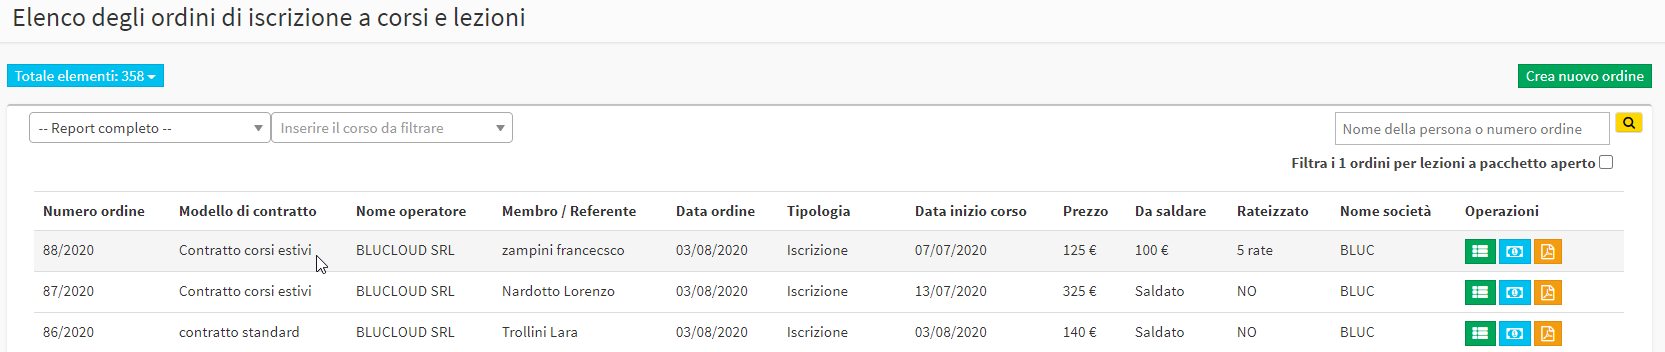
It will then be possible to download the issued order file (in the format chosen during contract template configuration) or send it by email by clicking the icon ![]() .
.
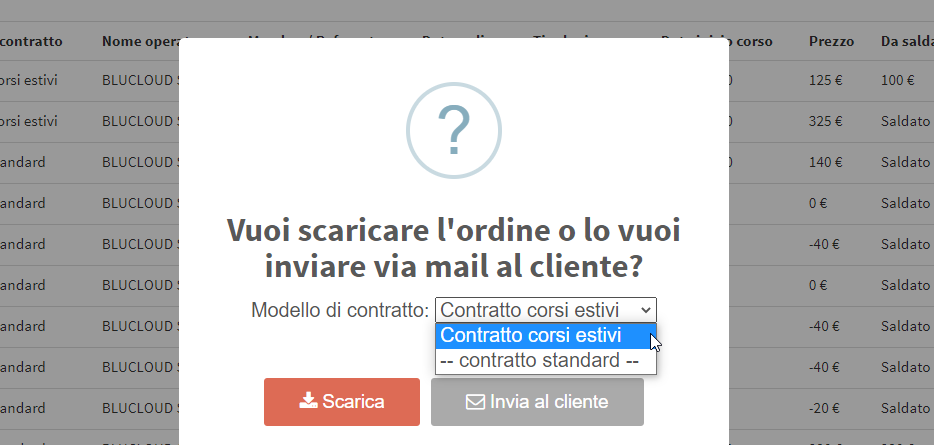
Now, from the next pop-up shown by the system, it will be possible:
- Contract Template: choose to download/send the enrollment contract to the client, using a different template than the one chosen during enrollment, via the relevant drop-down menu. By default, the system pre-selects the contract template chosen during enrollment
- Download: download the membership contract file (in the extension that was chosen during setup, so PDF or ODT)
- Send to client: send the client the enrollment contract via email
10. EXAMPLES OF USE
1. Sample standard contract template