Transferring a Student to a class in another course
This guide will explain the configuration and operation of Transferring a Student to a class in another course.
In order to make this type of transfer, you must have configured the levels related to the courses, for guidance on configuring levels click here.
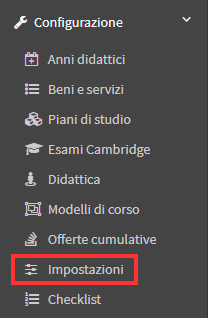
Once you have configured the levels you will have to enable the ability to transfer students to classes in other courses, to do this you will have to go into Configuration→ Settings→ Course-related settings→ Manage classes:
Once here you will have to put a check in the option "Enable student to make lesson changes in courses with equivalent level."
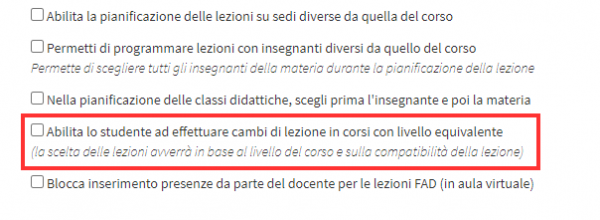
Two additional fields will then be shown in which you can enter the minimum limit of days' notice to make the transfer to a class in another course, also you can indicate whether the transfer can take place in classes that take place at the same time as the original one so that no conflicts with the student are detected:

Once the various ticks have been entered, the settings can be saved using the appropriate "Apply Changes" button.
At this point you can proceed with the creation of the courses that will use this feature, during the creation of the courses you will need to enter the option "Authorize students to take classes in compatible courses."
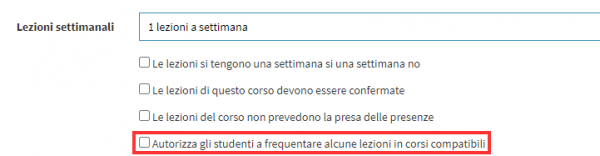
As a result, the field where the number of moves allowed to the individual student should be entered will be shown:

As you continue with the configuration you will need to enter "Starting Level" and "Finish Level" of the course:
![]()
WARNING. If levels are not entered within the course, it will not be possible to move to classes in other courses.
Once the configuration of courses is completed, going to enroll students in them, the "Enrolled Students" section will show the number of moves available for the student (e.g., 2 moves available out of 2 total):

At this point, students can proceed to transfer to classes of compatible courses.
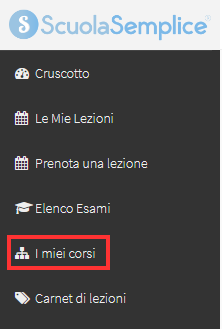
To make the transfer, once logged into the system, students will need to access the "My Courses" section:
From the list of courses they will need to access theClass Schedule of the course in which they are enrolled:

Once here they can view the entire course schedule, to the right of the next lesson will be a button to make a transfer to a lesson in a compatible course:

Once you click on it, a PopUp will be shown where you can select, via the appropriate field, the lesson to which you want to transfer:
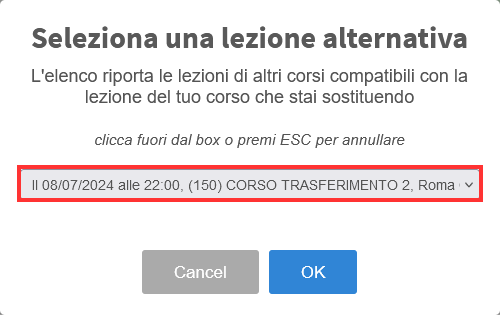
Then clicking "Ok" will confirm the transfer and in the original lesson will show that a transfer has been made, also with the other two buttons it will be possible to Cancel the transfer or view the course tab to which the lesson to which you chose to transfer belongs:
![]()
At this point the procedure will appear as complete.
Once the transfer has been made, if on the Registrar's Office side one accesses the "Enrolled Students" section of the course to which they have transferred it will be indicated that the student is enrolled only for a single class unlike the others where "Full" will be indicated as the type of enrollment:

Instead, going to the student's original course will show that only 1 move out of 2 total is now available and that the student has been moved to a class in another course:
