Teacher App - First access and basic operations
→ Download this guide in PDF format![]()
Quick guide index:
- Download the App of ScuolaSemplice and log in
- Retrieving accesses
- App home page
- Schedules
- Lessons
- Indicate a future lesson as to be made up
- Recording attendance
Connect to Google Play Store o Apple Store and search for the App "scuolasemplice", making sure to write the name without spaces. Then install the App using the standard procedure.
Upon opening the App, the following screen is displayed:
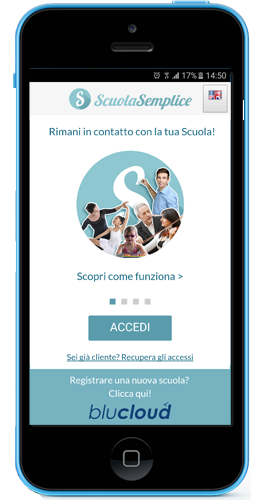
By clicking the "flag" icon at the top right of the screen you can change the language of the App to English.
In order to connect to the school, you must be in possession of the personal teacher code.
In case you do not have your code available, request it from the school administration.
If, on the other hand, you are already registered but no longer have the code available, read below for the retrieval procedure.
- Access recovery procedure
If you are a faculty member already registered in the system but do not have the code, for example because you changed phones or had to reinstall the App at ScuolaSemplice, you can retrieve it by clicking on the link Already registered? Recover access present on the first screen of the App.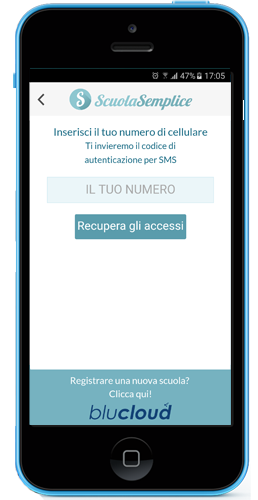
Enter your cell phone number in the YOUR NUMBER field and click on Retrieve accesses.
Within a few seconds, the system will send an SMS with the new personal access code.
Then return to the App's home screen and enter your new personal code on the INSERT CODE field.
Then click the LOGIN to display the following screen:
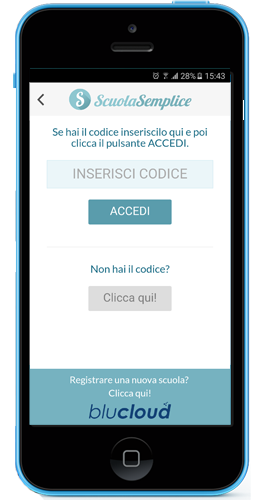
Enter your personal code in the field ENTER CODE and click the LOGIN.
After logging in, the home page of the App is shown, with links to the main sections.
App home page
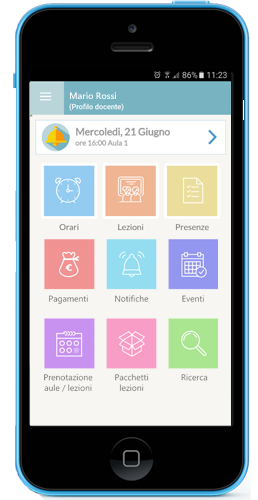
In the top band is the name of the user with the profile, in this case teacher, indicated.
The box at the top with the bell icon indicates the next class to be taught, with details of the date, time, and location (venue and classroom).
By clicking on the box, the App will show the entire schedule of upcoming classes.
Schedules
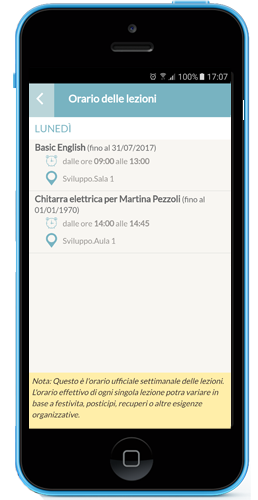
From this button the weekly class schedule is accessed.
For each day, the scheduled courses are then shown with various details regarding time and location.
This screen is thus intended to be the official weekly teacher's schedule, after which the actual times of individual classes may be subject to change based on holidays, postponements, make-ups, or other organizational needs.
Lessons
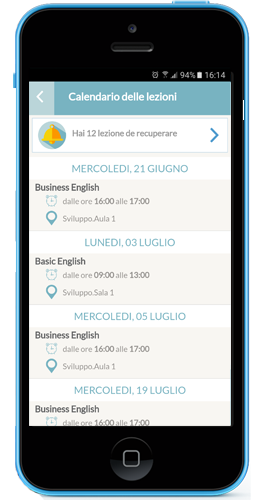
This button provides access to the full schedule of upcoming classes.
The screen first shows a box at the top with an indication of the classes that have already been marked as to be made up on a date other than the original date.
Below that, the App shows the complete list of future classes to be held, indicating the course, date, time location and classroom for each.
Indicate a future lesson as to be made up
If you need to indicate that you will not be able to teach one of the upcoming classes, you can indicate the class as to be made up. In this way, the lesson will be removed from the schedule of future lessons and placed in the list of those to be made up.
To indicate a lesson as to be made up, from the list of lessons click on the lesson concerned.
Then click on the red button Skipped lesson and confirm by pressing OK.
Presence
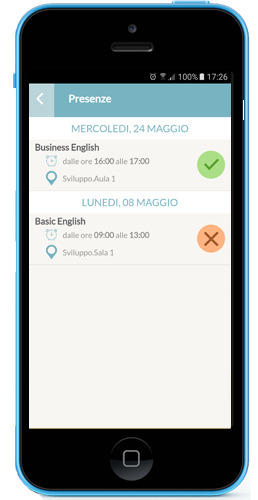
From the App home page, click on the Attendance.
The App shows the list of past lectures in chronological order: for each lecture, the course to which it belongs, the day, time, location and classroom of the lecture are indicated.
The icons on the right show the status of attendance: the green icon indicates that attendance has already been successfully recorded while the red icon indicates that attendance still needs to be recorded for the lesson.
Classes with registered attendance will remain visible on the list for the current day while those yet to be registered will remain on the list until attendance is indicated.
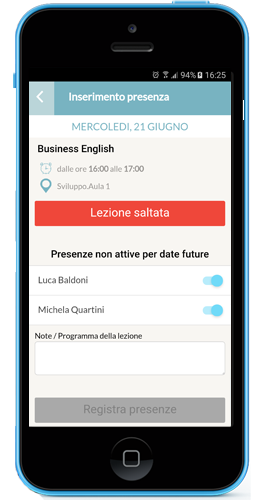
Recording attendance
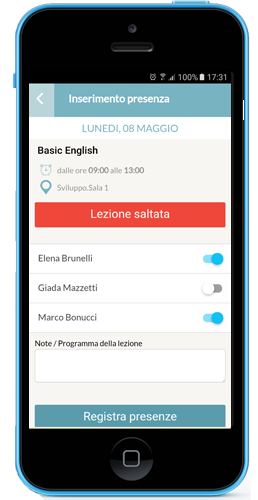
To record attendance click on the relevant lesson; the App shows the details of the lesson (course, date, time and place) while from the Missed Lesson button you can still indicate as to be made up.
Otherwise, click the button related to the presence of each student enrolled in the course: the system will show a single enrolled student for individual courses or the list of enrolled students for group courses.
By default, the App will indicate those enrolled as present (light blue button); you will then have to click the relevant student's button to indicate their absence.
Contextually, via the field Notes / Lesson Schedule it is possible to enter comments regarding the lesson held that will be visible in the administrative part of the system.
Finally, click on Record Attendance to save the data.