Create and link protocol numbers to an Attestation/Certification
Create the Protocol numbers and link them to the Attestations/Certificates can be very useful for numbering the Certificates issued In addition, this allows the System to unlock certain functions such as those for the massive sending of Certificates by Email or the ability to automatically send Certificates/Certificates upon passing a Quiz.
To configure Protocol Numbers navigate to Configuration -> Protocol Numbers we will be able to add various protocols within which we can then add Protocol Numbers using the appropriate button.
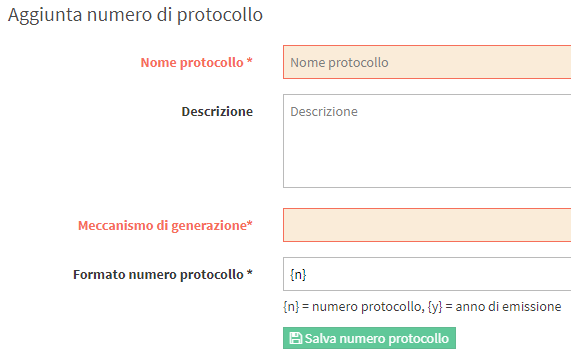
For their creation it will be sufficient to specify the name of the Protocol and the mechanism of generation of numbers within it:

- Automatic generation: This setting allows you to choose the first protocol number from which to start progressively
- Manual allocation: This setting allows manual allocation of protocol numbers without automating the progressive numerical allocation
1a. Manual allocation of protocol numbers
After creating the Protocol, clicking on the green button ![]() we will have access to the chosen protocol, where we will have an overview of the protocol numbers generated and the possibility of creating them.
we will have access to the chosen protocol, where we will have an overview of the protocol numbers generated and the possibility of creating them.
Clicking on the blue button ![]() we will access the screen that will give us the option of "blocking" an amount of numbers at our discretion, simply by asking us which protocol number to start with and end at (and giving us the option of changing the Reference Year) :
we will access the screen that will give us the option of "blocking" an amount of numbers at our discretion, simply by asking us which protocol number to start with and end at (and giving us the option of changing the Reference Year) :
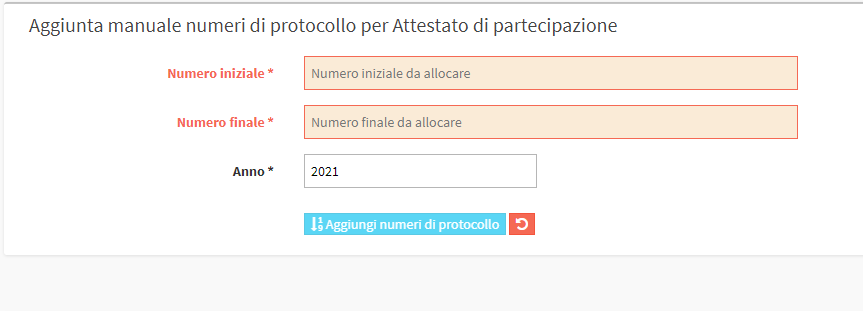
After entering the Initial Number and Final Number and generating the protocol numbers, the management system will take us back to the main screen, where you can immediately see the Protocol Numbers you just created.
1b. Automatic generation of protocol numbers
When creating the Protocol, choosing the Automatic Generation option will prompt us for the first number from which to begin generation:
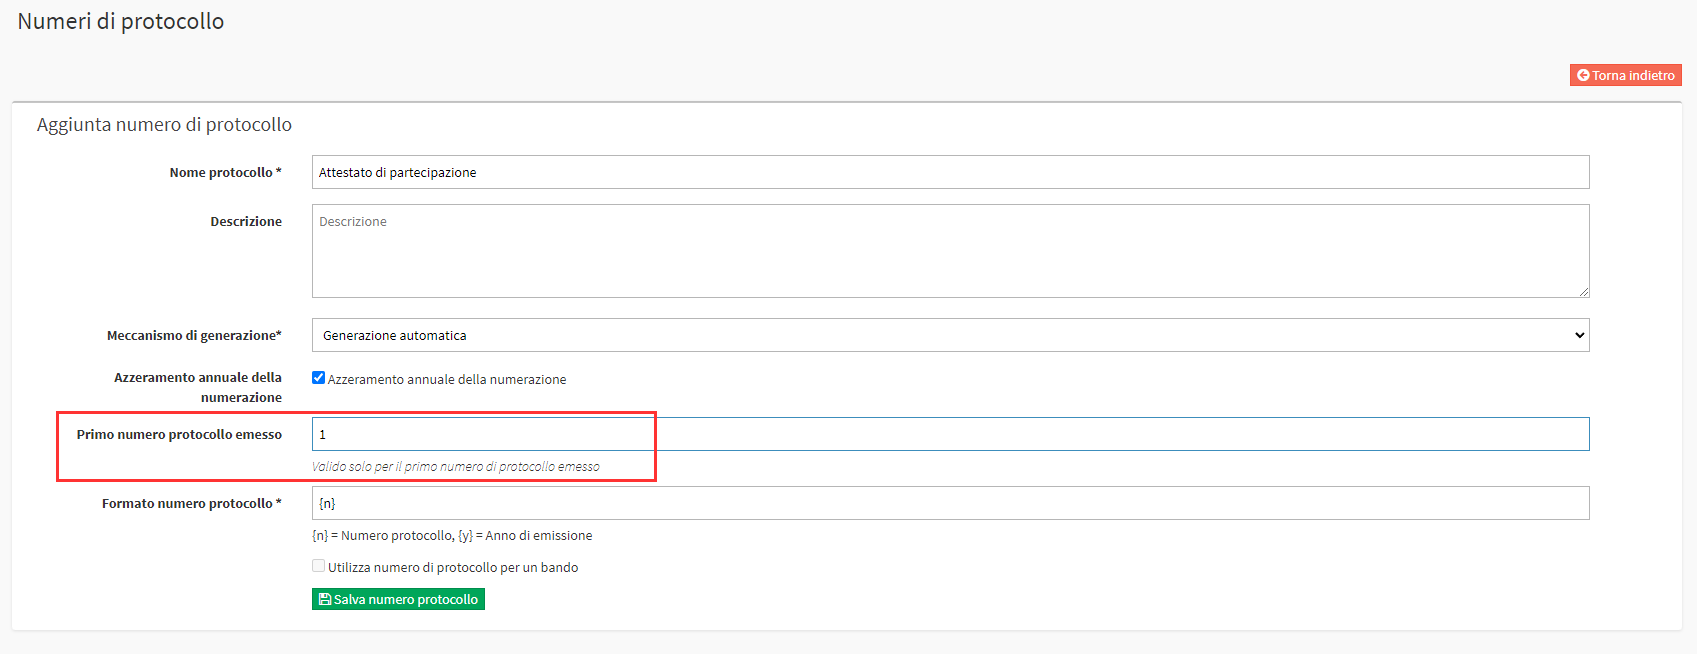
With automatic generation, it will not be necessary to create protocol numbers from time to time, at the time of generating a certificate linked to this protocol, automatically the protocol number will be assigned progressively starting from the first one configured
2. Linking Protocol Number to Report
Once the Protocol Number has been created we will need to link our Report of Interest to the Protocol Number we just created.
Navigate to Configuration → Contracts & Reports and click on the Edit icon for the Report of interest:
Navigate to the Section in which to show the Report and configure the screen as follows:

Taking care to select the check mark This is a certificate/attestation, to be issued in an unmodifiable version.
The section will appear Link a protocol number, here you will need to indicate the newly created Protocol Number.
3. Linking the certificate to the course
Now that we have created the Protocol Numbers, we will need to go into the course and link the certificate/certificate, so we enter the course from Didactics -> Group courses and in the Tab ![]() we will find the reference field Related certificate/certificate, where we are going to select the Protocol we just created:
we will find the reference field Related certificate/certificate, where we are going to select the Protocol we just created:

Only after performing this operation, in the Tab ![]() next to each student enrolled in the course, a new column regarding certificates/certificates will appear:
next to each student enrolled in the course, a new column regarding certificates/certificates will appear:
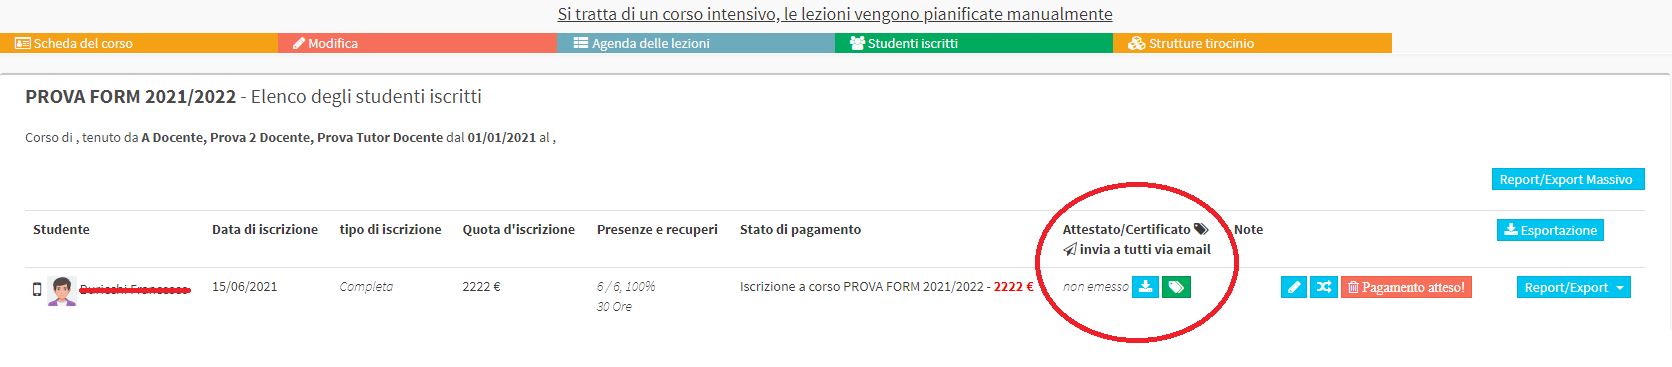
Clicking on the blue button ![]() we will be able to download the certificate as a PREVIEW without then generating the protocol number but simply to be certain that the information entered in the certificate we are going to generate is correct.
we will be able to download the certificate as a PREVIEW without then generating the protocol number but simply to be certain that the information entered in the certificate we are going to generate is correct.
Clicking on the green button ![]() we are going to GENERATE the certificate in its entirety, thus making it official and thus locking in the protocol number, which can no longer be used for any other document.
we are going to GENERATE the certificate in its entirety, thus making it official and thus locking in the protocol number, which can no longer be used for any other document.
After clicking on the green button, an additional window will appear in which we need to confirm our choice (inserted to avoid any errors in the irreversible generation of the certificate)
We have finally generated our Attestation with the Unique protocol number and now we can immediately see that the two buttons in the Attestation/Certificate column have been replaced in a green one respectively ![]() which has the function of downloading the certificate with its protocol number already applied, and in a yellow
which has the function of downloading the certificate with its protocol number already applied, and in a yellow ![]() which we will use to immediately send the newly generated certificate directly to the student's Email address (if it is in the student's record)
which we will use to immediately send the newly generated certificate directly to the student's Email address (if it is in the student's record)