Configuring roles to be associated with system administrators
To configure the roles to be associated with system administrators (e.g., "Secretariat," "Administration," "Trainee," etc. cc) navigate to Administration → Administrators and, from the next screen, click the orange button at the top Manage Roles.
N.B. Only a Super Admin administrative account will be able to view the Administrators menu item and access it.
Then enter:
- Role name: the name of the role associated with system administrators (e.g., "Secretariat," "Administration," "Trainee," etc. cc)
- Sorting: enter a number to sort the list of roles
As soon as it is added, the role is highlighted as "Role not configured"; click the central icon ![]() to configure in a timely manner the sections of the system accessible to it.
to configure in a timely manner the sections of the system accessible to it.
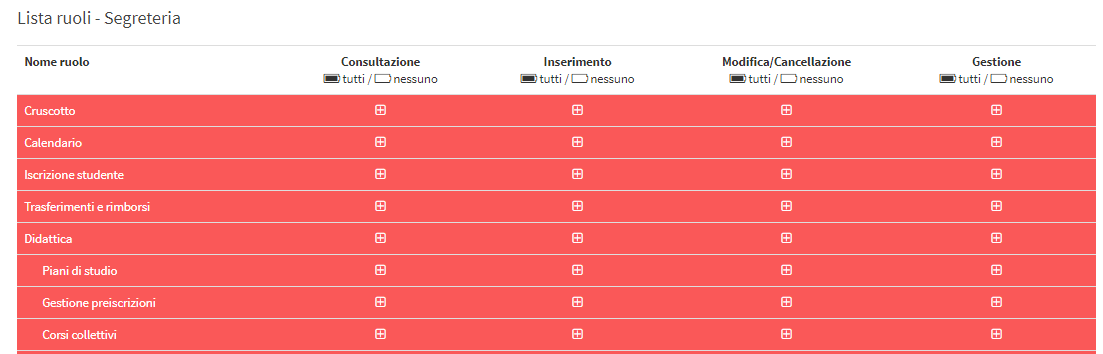
As soon as it is created, all sections of the system will be highlighted in red since they have yet to be configured; click the icons with + to enable consultation, insertion, modification/deletion, and management of the various sections of the system (once enabled, click on the checkmark in case you want to disable them).
Consultation: Allows only viewing of the section with no possibility of action
Entry: Allows entry of information that is not yet in the system (e.g., add a new registry or a new course, etc.).
Edit/Delete: Allows editing and deletion of existing information in the system (e.g., deleting an order, changing the characteristics of a course, etc.).
Management: Implies special rights on the section to which it is applied (For example, mass downloading of master records, which is inhibited for confidentiality reasons to roles we do not have in complete control).
To perform this procedure more quickly in case there are few sections to be left disabled, click "all" on each column to massively enable all sections of the system, and then remove one by one the ticks of the sections to be left disabled
N.B. The caution triangle that says "Role not configured" will remain on the role line until you have enabled or disabled all sections of the system (there should be no more red lines).
Pingback: How to add new system administrators - The Wiki of ScuolaSemplice