Student Web Account Activation
In the event that a student does not have a smartphone or cannot use the App of ScuolaSemplice for other reasons, it will still be possible to provide him with access to the school's dedicated Web system.
Next, navigate to the Master Data → Students.
At this point it will be possible to pursue two different avenues: an automatic one where the system will create a random password and automatically send it to the user; and a manual one through which a password will have to be created and emailed to the user, manually.
Automatic mode
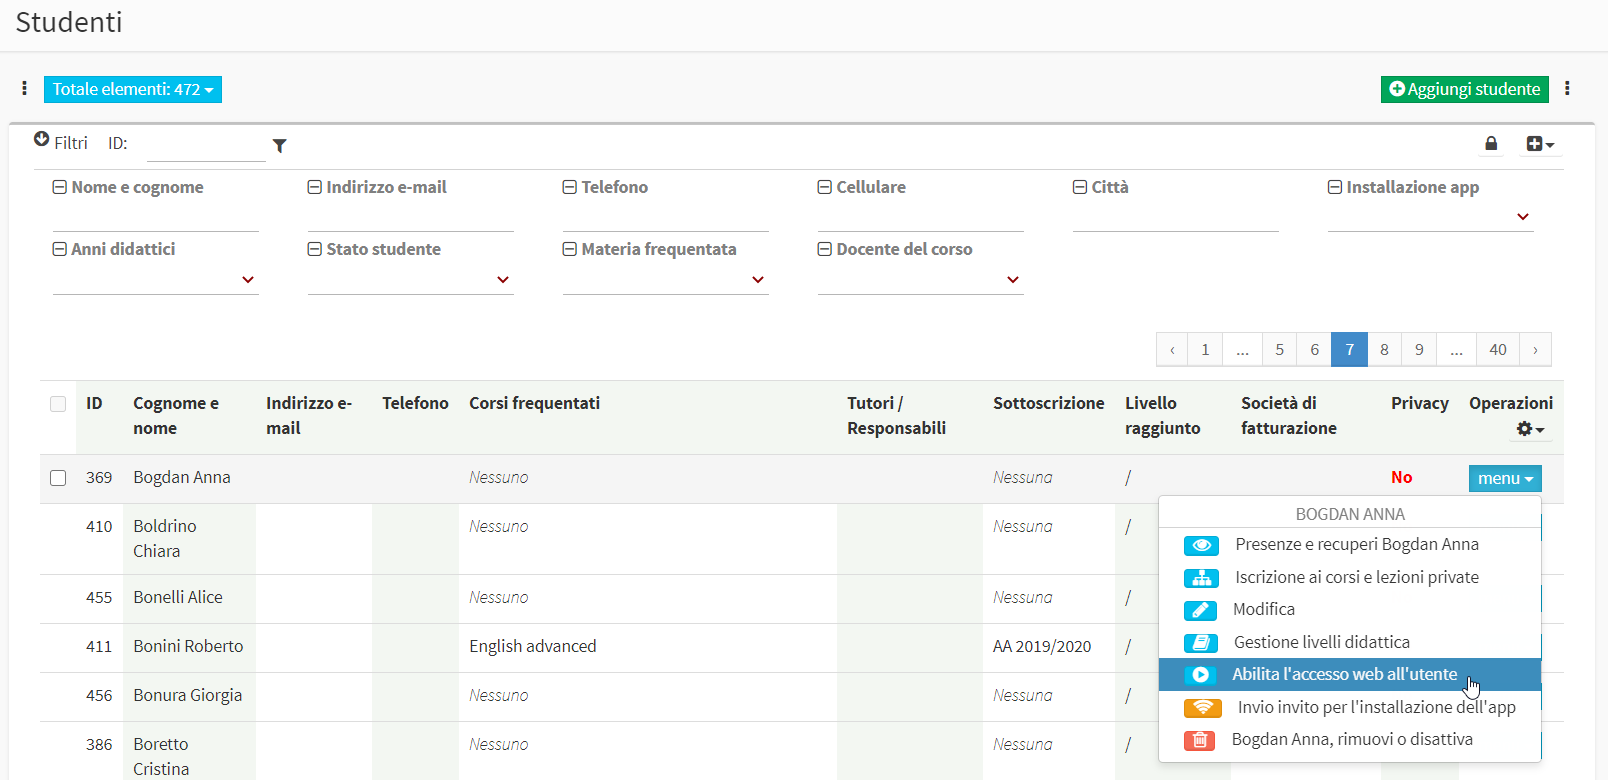
From the next screen, click the "Menu" on the master data row of the student for whom you intend to create web account access and click the "Enable web access to the user".

PLEASE NOTE: Make sure you have entered the email address in the student record in the appropriate field, which will represent the username to access your account
The system will then automatically send an email to the student, which will include the link to the Web address to which he or she will log in ( e.g., "nomescuola.scuolasemplice.it") , the username (i.e., the email address to which the login was sent) and a random password created by the system, which must be changed by the user after he or she has logged in for the first time by clicking above his or her name in the upper right-hand corner of the screen.
To check whether the user is logged in to their web account for the first time, click the gear icon in the upper right corner of the master records list and add the "Web" column.

The columns in the master list can be moved in the order you prefer by dragging them to the right or left, keeping the left mouse button clicked on them.

The icon ![]() means that user access has been sent, waiting for the first log in; the icon
means that user access has been sent, waiting for the first log in; the icon ![]() instead means that the login is active and the user has logged in for the first time.
instead means that the login is active and the user has logged in for the first time.
Finally, the icon ![]() indicates that Web access can be enabled for the user, while it will not be present if the email address has not been entered in the master record. Clicking the icon, in the same way as explained just above, will create and send Web access to the user.
indicates that Web access can be enabled for the user, while it will not be present if the email address has not been entered in the master record. Clicking the icon, in the same way as explained just above, will create and send Web access to the user.
Manual mode
From the next screen, click the "Menu" on the student's row and below on "Edit".
From the next screen, enhance the "Enable Web Access" and enter:
- Email address: the student's email address will be used as the username to log into the system (this email address must be unique, it cannot belong to multiple users)
- Password: create a password to access the student's system
- Confirm Password: confirm the password entered in the previous field
Click the Apply Changes button to save the operation.
Email address and password will then be the credentials that the school will need to communicate to the student to allow him or her access to his or her account
The school must also provide the student with the link to connect to the Web portal, exactly the same one the school uses to connect.
N.B Through Web access to the school's portal, the student will only be able to view his or her own information, thus the courses in which he or she is enrolled, the classes in which he or she is scheduled to attend, and his or her own payments that have been settled and are yet to be settled.