Creating custom fields for master records and other sections of the system
Custom fields or custom fields are fields that you can create yourself to add additional information than those present by default in the various sections: master data, enrollment orders, courses, etc etc.
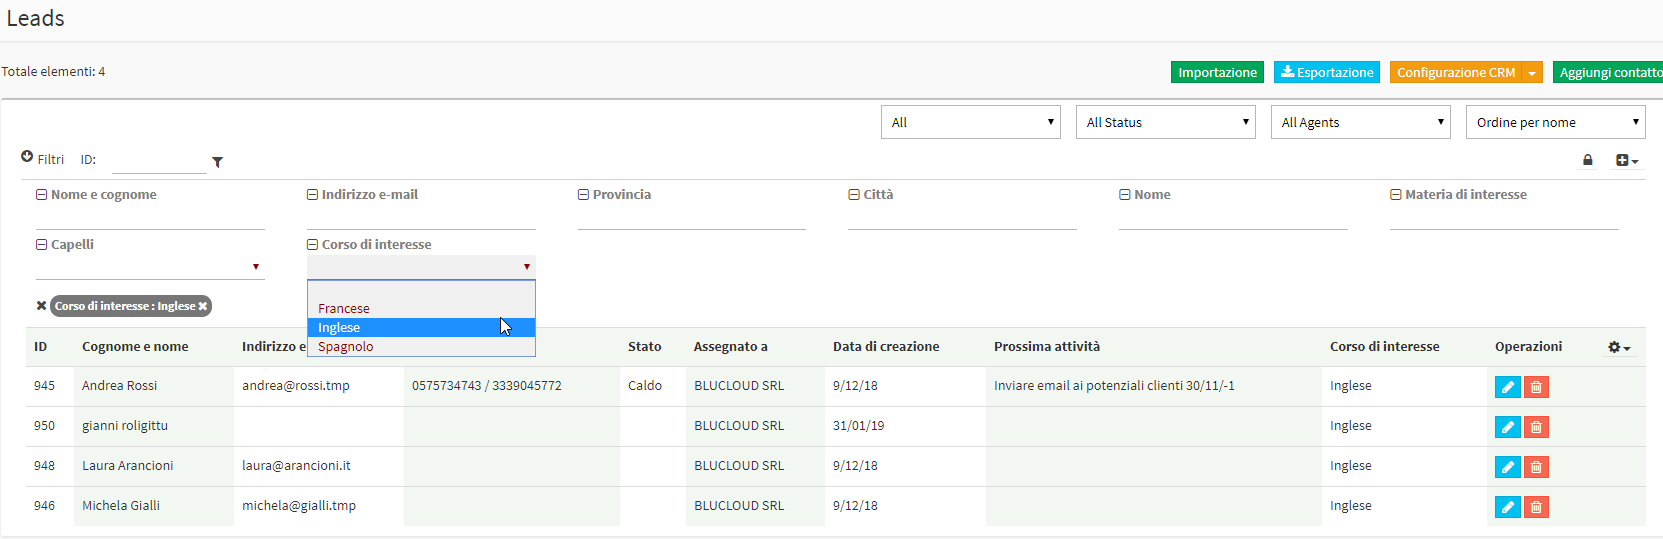
Using custom heads, in addition to filtering the master records based on a specific characteristic, you will also be able to filter the recipients of a communication that you intend to send, which is also very useful in this case for example to send a promotional message to a group of potential customers interested in a certain type of course(click here to read the article on sending messages).
Example:
To create the custom fields to add to the fields already in the system, navigate to Configuration → Custom Fields:
N.B. The custom fields entered for student biographies will also be used for the biographies of potential clients in the CRM section.
"All biographies" represent the custom fields present in both students, tutors/supervisors and faculty.
The fields to be filled in to create a new custom field will be as follows:
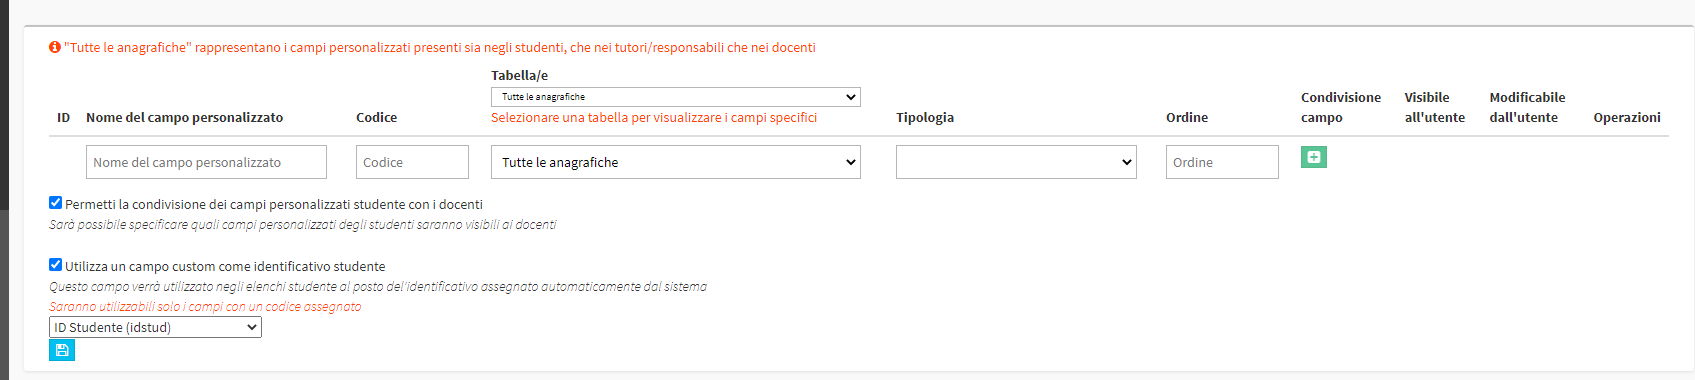
- Custom field name: the name of the custom field you want to add
- Code: the code (UNIQUE) if entered enables the use of that custom field in custom reports, custom enrollment forms, and other parts of the system where this custom information can be used/filtered
- Table(s): indicate for which registry you intend to add the custom field by being able to choose from:
- All master records: all master records in the system will be enriched with the new custom field
- Lecturer: teacher master data will be enriched with the new custom field
- Student: the student master records and the Leads master records of the CRM will be enriched with the new custom field
- Guardian / Manager: guardian/responsible registries will be enriched with the new custom field
- Courses: Group and individual courses will be enriched with the new custom field
- Purchase Orders.: Purchase orders will be enriched with the new custom field. In this way, when enrolling a student in a course, it will then also be possible to enhance any added custom fields, which can be used for various purposes such as generating reports for statistical purposes, or simply to enrich the enrollment receipt.
- Locations: Adds a field in the master data section → Locations.
- Attendance Entry: Adds the field in the attendance entry screen.
- Customers/Suppliers: the customer and supplier master records in the fiscal management section.
- Contact: represents a custom field related to the internship, ask for more information at the support chat
- Internship: Enters the field in the Internship section.
- Final Judgment: Adds the field in the Final Judgement entry screen.
- Technical Data: represents a custom field related to the internship, ask for more information at the support chat
- Typology:
- textual field: consists of a field in which you can write freely
- text area: consists of an area in which you can write freely (the space in which to write is larger than in the previous option)
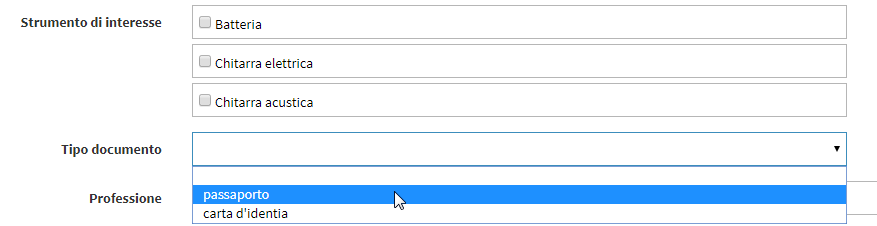
- single choice*: from a drop-down menu, it will be possible to choose an option from those present
- multiple choice*: by valorizing one or more checkboxes, it will be possible to choose one or more options at the same time
- CheckBox: consists of single choice to be valorized or not
- HTML: Allows the insertion of an HTML code.
- File: Creates a field for uploading a File of any extension
- File with expiration: Indicates a field of type File with the option to enter the expiration date (e.g., for documents)
- Order: custom field listing order
- Placeholder: the placeholder that appears in the custom field as long as it is not filled in
Click the "+" button to complete the operation:

The correctly created field will appear like this:

*In case of single choice or multiple choice, you will also need to enter two or more possible choices by clicking the icon Show selection values on the row of the specific custom field:

Entering Edit of a Custom Field additional settings will be visible:
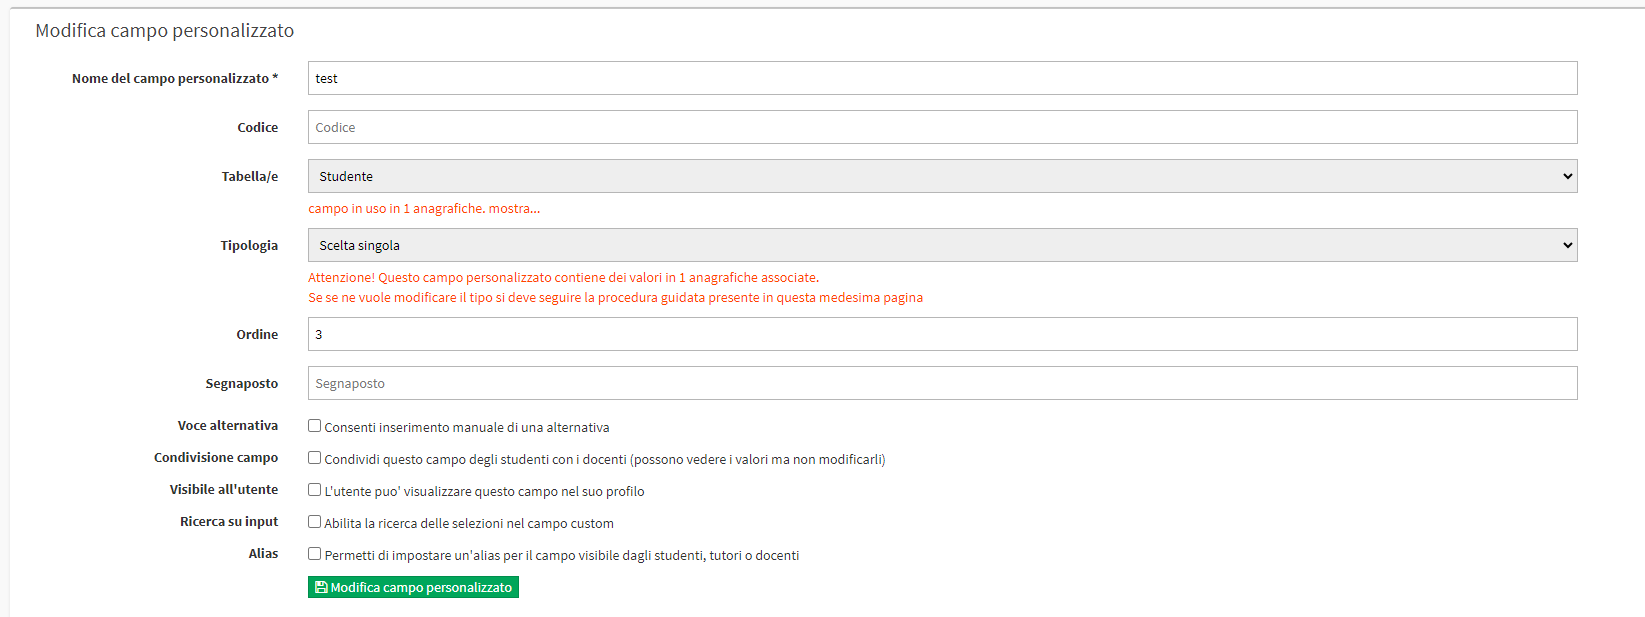
- Alternate entry: Available only for single- or multiple-choice fields allows entry of an alternate entry not in the list.
- Field Sharing: Shares the field with Teachers (visible only if enabled).
- Visible to the user: The field will be visible to the user without the possibility of editing.
- Search on input: In the custom field, it will be possible to search for the item to be entered.
- Alias: Setting an Alias in the sections will show the name entered in the Alias and not the Custom Field Name.
Note: Settings may vary by Field type, in case of items not listed in the following article, type the name of the item in the Wiki search bar to find related articles.
Sample student registry (top: Multiple choice. bottom: Single choice):
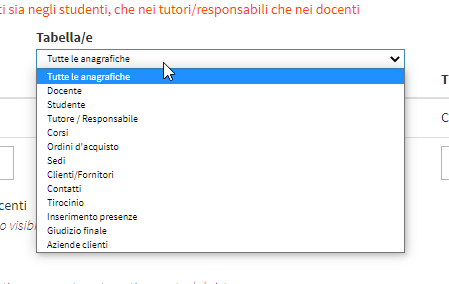
Using the small drop-down menu just below "Table(s)" you will be able to select a table to view the specific fields created:
Flagging the checkbox "Allow sharing of student custom fields with faculty." it will be possible to specify, in Editing a field, whether it is shared with the Lecturer or not:

Flagging the checkbox "Use a custom field as student identifier", it will be possible to use the custom field in student lists instead of the identifier automatically assigned by the system:

Click here to enable students to view and edit their own custom fields.
Click here enable sharing of Student's custom fields with Teacher.
Click here to arrange custom camps for Courses in Groups and Sub-Groups.
Pingback: CRM - Customer Relationship Management - The Wiki of ScuolaSemplice