Multi-branch module activation
For more information on activating the Premium Package Multi Branch Module contact us at: commercial@blucloud.it.
CAUTION DO NOT USE MULTIPLE NAVIGATION TABS FOR DIFFERENT BRANCHES
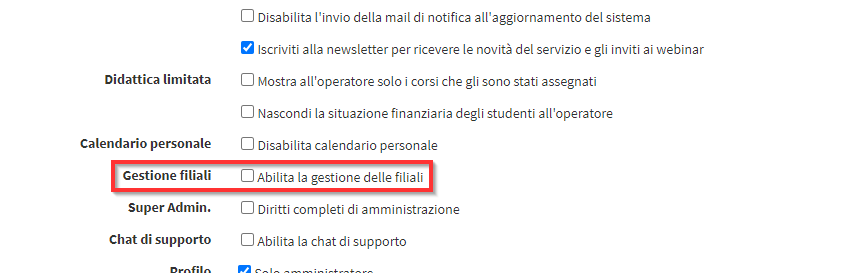
Once the system has been enabled to use the multi-branch module, the administrator account with full administrative rights (Super Admin) will be able to enable the remaining administrators to manage the branches through the following setting found in edit administrators:
Once the account has been enabled for branch management in the left column will appear the section Administration→ Branch Management.
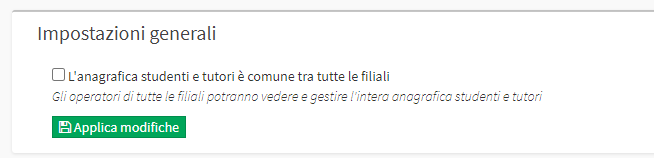
By accessing within the section, it will be possible to indicate whether students and parents will be visible for all branches or only for the one in which the records were created:
Also in this section, it is also possible to create a new branch office using the appropriate button (however, an agreement with the sales department will be necessary before proceeding BLUCLOUD):

For the present Branches there are 3 buttons with different functionalities:
- Remove: Allows you to remove the thread(ONLY IF UNUSED)
- Managing administrators and faculty: Allows you to connect Administrators e Lecturers to the selected Branch

- Change branch configuration: Allows various settings concerning the branch to be changed:
- Branch Name: Allows you to edit the Branch Name
- Description: Allow you to enter a brief description of the branch
- Enterprise management: Enables the branch to manage enterprise courses
- Virtual Location: Enables the branch to be used as a virtual location for corporate course management
- Fiscal Management: By enabling this option, the branch will manage Invoices, Receipts and Receipts/Outgoings on its own and they will not be visible to other branches in the system; orders, on the other hand, will be visible to all branches regardless of whether the option has been enabled or not.
- Full access to master records: Allows the branch to view all branch master records in the system
- Full access to courses: Allows the branch to view all branch courses in the system
- Sending Communications: If selected, the branch in question will use its own settings for sending communications and will be configurable by following This guide
- Code: Allows you to enter the code of the Branch
- Calendar: Allows other branches' classes not to be displayed in the general calendar
By enabling this option, the branch will handle Invoices, Receipts and Inputs/Outputs on its own and they will not be visible to other branches in the system; orders, on the other hand, will be visible to all branches regardless of whether the option has been enabled or not.
Below you will find a list of functions that may or may not be shared between branches when configuring them:
- Course templates
- Study plans
- Carnet
- Goods and services
- Online Forms and Master Data Forms
- Locations
They will be shareable by activating the option during configuration or by entering edit:

As for Matters , on the other hand, they are shared among branches, and it is not possible to assign them to a particular branch.
CAUTION: REMOVING A MATTER FROM ONE BRANCH WILL ALSO REMOVE IT FROM OTHER BRANCHES
Even if the subjects are shared among branches theTeachers even if connected to them will be visible only from the branch to which they have been connected.
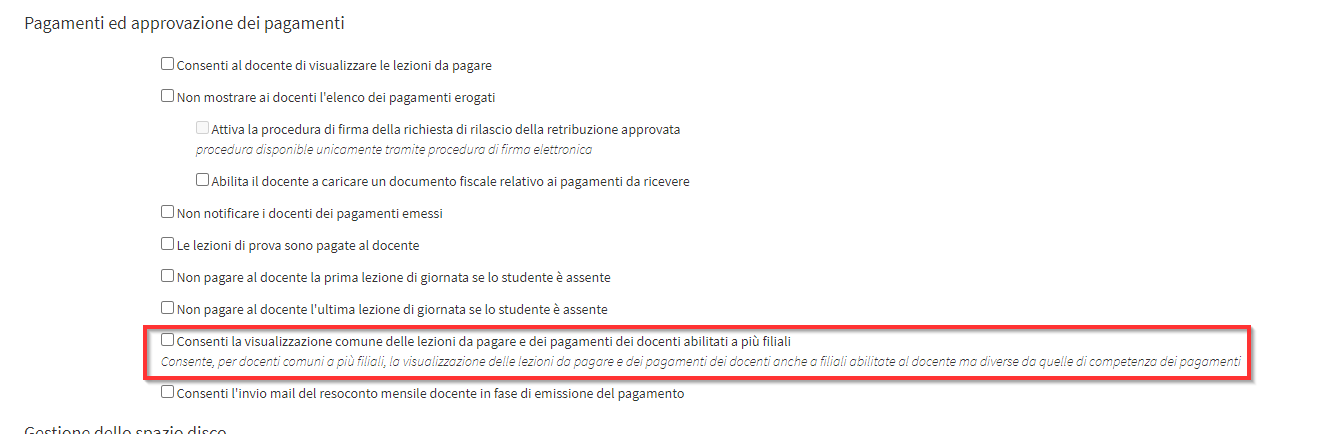
As for the Payment of teachers Instead, you can set up information sharing from Configuration→ Settings→ Settings related to teachers→ Payments and payment approval By activating the following checkmark: