Individual course enrollment and group course enrollment
To create a new individual course or enroll a student in an existing group course, click the Student Enrollment of the main menu.
If the student's student record is not in the system, it can be entered from the enrollment page itself by clicking the link Create a new student registry.
Selecting the checkbox Generating a quote you can create a quote to be left with the student without actually enrolling in the course. The quote can be converted to enrollment at a later time. For more information on generating quotes, see the related guides in the Wiki.
Therefore, indicate:
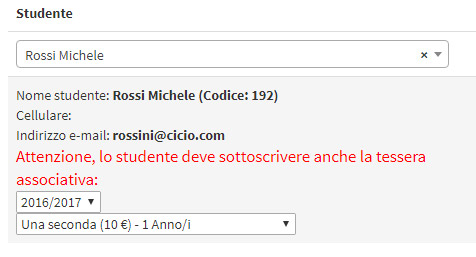
- Student: type the first or last name of the student to be enrolled. When the student is selected the student's details are shown immediately below and whether the student must subscribe to the membership card for the relevant academic year (if the membership card is active). Then select in case the relevant academic year and choose the membership card from those in the system.
- Select a course, offering, carnet, good or service: from the light blue button, it is possible to filter for all the
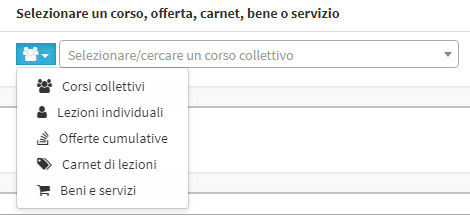 course types present in the system, and then search for them punctually in the text field next to it. It is then possible, for example, to search either for existing group courses or for the subject matter of the new individual course (the other types are covered in the specific guide).
If a group course is chosen, the system shows the course details (location, lecturer, course start date, cost, current enrollment).
In the case of selecting a new individual course instead, the system shows the following fields to be filled in: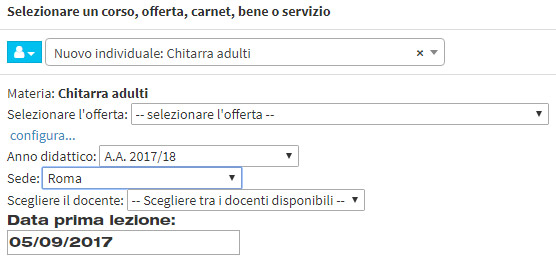
- Select the offering: select the course type from the existing ones (created in the section Course types).
- Educational year: set the educational year, by default the current one
- Venue: set the course location
- Choose lecturer: select the lecturer from those associated with the selected subject
- First class date: indicate the start date of the course
Then click the "+" to add the course in the order form below.
The newly added course is displayed at the bottom of the screen, where you can manage the economic part.
If a membership card has also been added, it will be automatically entered into the order form on a different entry.
In case you also want to add another course to the order form, repeat the procedure described in this guide. The course will be added on a different entry.
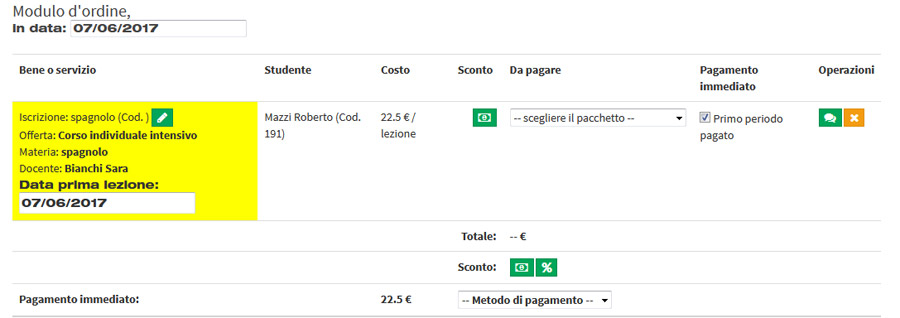
In particular:
- on date: the date of the order, by default is the current day
- Good or service: the course (or good) added in the order form
- First lesson date: the date of the first class (in case of individual course) entered above in the course/subject choice
- Student: the student associated with the course
- Discount: button allows you to enter any discount (in € or %) on the cost of the individual item on the order form
- To be paid: the amount to be paid: the cost can be displayed in case of a one-time cost or monthly fee or the list of packages (months/hours/lessons) matched to the type (they are matched as the cost of the unit month/hour/lesson of the course type coincides with the cost of the unit month/hour/lesson of the package)
- Immediate payment: select to indicate that the amount to be paid is immediately paid in full by the enrollee. If not selected, the system displays the advance and installment fields (see just below)
- Operations
- add a comment: allows you to add a comment to the order entry, visible only from the administration
- remove item: allows you to remove the item from the order form
- Total: the total amount to be paid
- Discount: allows you to set a discount (in € or %) on the total amount to be paid
- Payment Method: allows you to indicate the payment method used for payment from those available and enabled
In case the flag Immediate Payment is not selected, the system shows the management of advance and installment payments, according to how they are set in the general economic configurations.
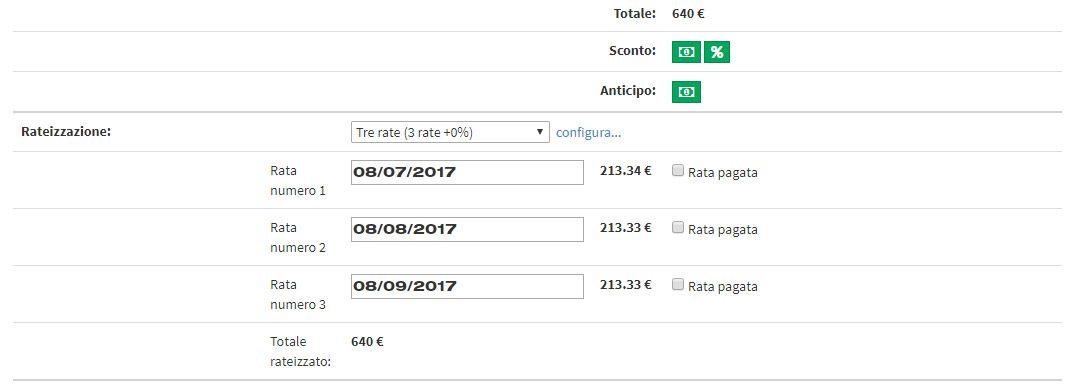
In particular:
- Down payment: allows you to indicate a payment of any amount as a down payment
- Accrual: select the type of installment from those available
- configure...: link to the accrual management., in the economic settings
- Single installment line
- date field: allows you to set a different installment due date. By default, the system sets the due dates with a frequency of 30 days (30, 60, 90 etc...)
- Amount: individual installment amount
- Paid installment: allows you to indicate whether one or more installments are paid at the time of enrollment
Finally, select the order holder: in case the new entrant is of age, the system will automatically fill in the field Guardian / Manager with the enrollee's data. Otherwise, it will be necessary to fill in the field with a guardian/responsible person or the student himself even if he is a minor.
On the other hand, if a guardian/responsible person has been linked to the student, the system will automatically choose him/her as the order holder (it will still be possible to replace him/her with the student himself/herself or another guardian/responsible person)
Then click on Confirm Order to save the data.
Printing of enrollment receipt
After confirmation, the system shows the order summary that can be printed as an enrollment receipt.
The form can be customized with the institution's logo and references: for more information on customizing the enrollment receipt, click here.